Unit 3: Preparing Assets
Operator |
Operation Location |
|---|---|
Developer |
EnOS Application Portal > Developer Portal |
This tutorial requires quickly creating simulated device assets and logical assets to support subsequent operations like asset permission assignments. If these assets already exist in the current OU, you may skip this unit.
This unit describes how developers can rapidly create these simulated assets in the Developer Portal.
Prerequisites
Before starting, ensure your account has been granted access to the following menus in Developer Portal: Model, Device Management > Product Management / Device Assets / Logical Assets / Asset Tree.
Step 1: Download Sample Files
Download sample files and extract them locally. The sample package contains:
File |
Description |
|---|---|
model |
Contains model information required for this tutorial. |
products.xlsx |
(Excel file) Contains product information for this tutorial. |
device assets |
Contains device asset information for this tutorial. |
logical assets |
Contains logical asset information for this tutorial. |
Step 2: Batch Import Models
Models primarily serve to abstract and standardize the characteristics and capabilities of business assets and their logical relationships in EnOS, facilitating data analysis and application processing. Models encompass asset features, capabilities, services provided, and potential events. This tutorial involves the following models:
Model |
Description |
|---|---|
Generic Region |
Represents business scope models for enterprises or branches. |
Generic Wind Farm |
Represents wind farm models including latitude/longitude, installed capacity, etc. |
Generic Solar Power Station |
Represents solar power station models including latitude/longitude, timezone, etc. |
Generic Wind Turbine |
Represents wind turbine equipment models including rated capacity, power, etc. |
Generic Solar Panel |
Represents solar panel equipment models including rated capacity, power, etc. |
As a developer, follow these steps to batch import the above models:
Log in to EnOS Application Portal and select the OU created earlier.
Click the Console icon
 in the top-right corner and select Developer Portal.
Navigate to Device > Model Management > Model in the left sidebar.
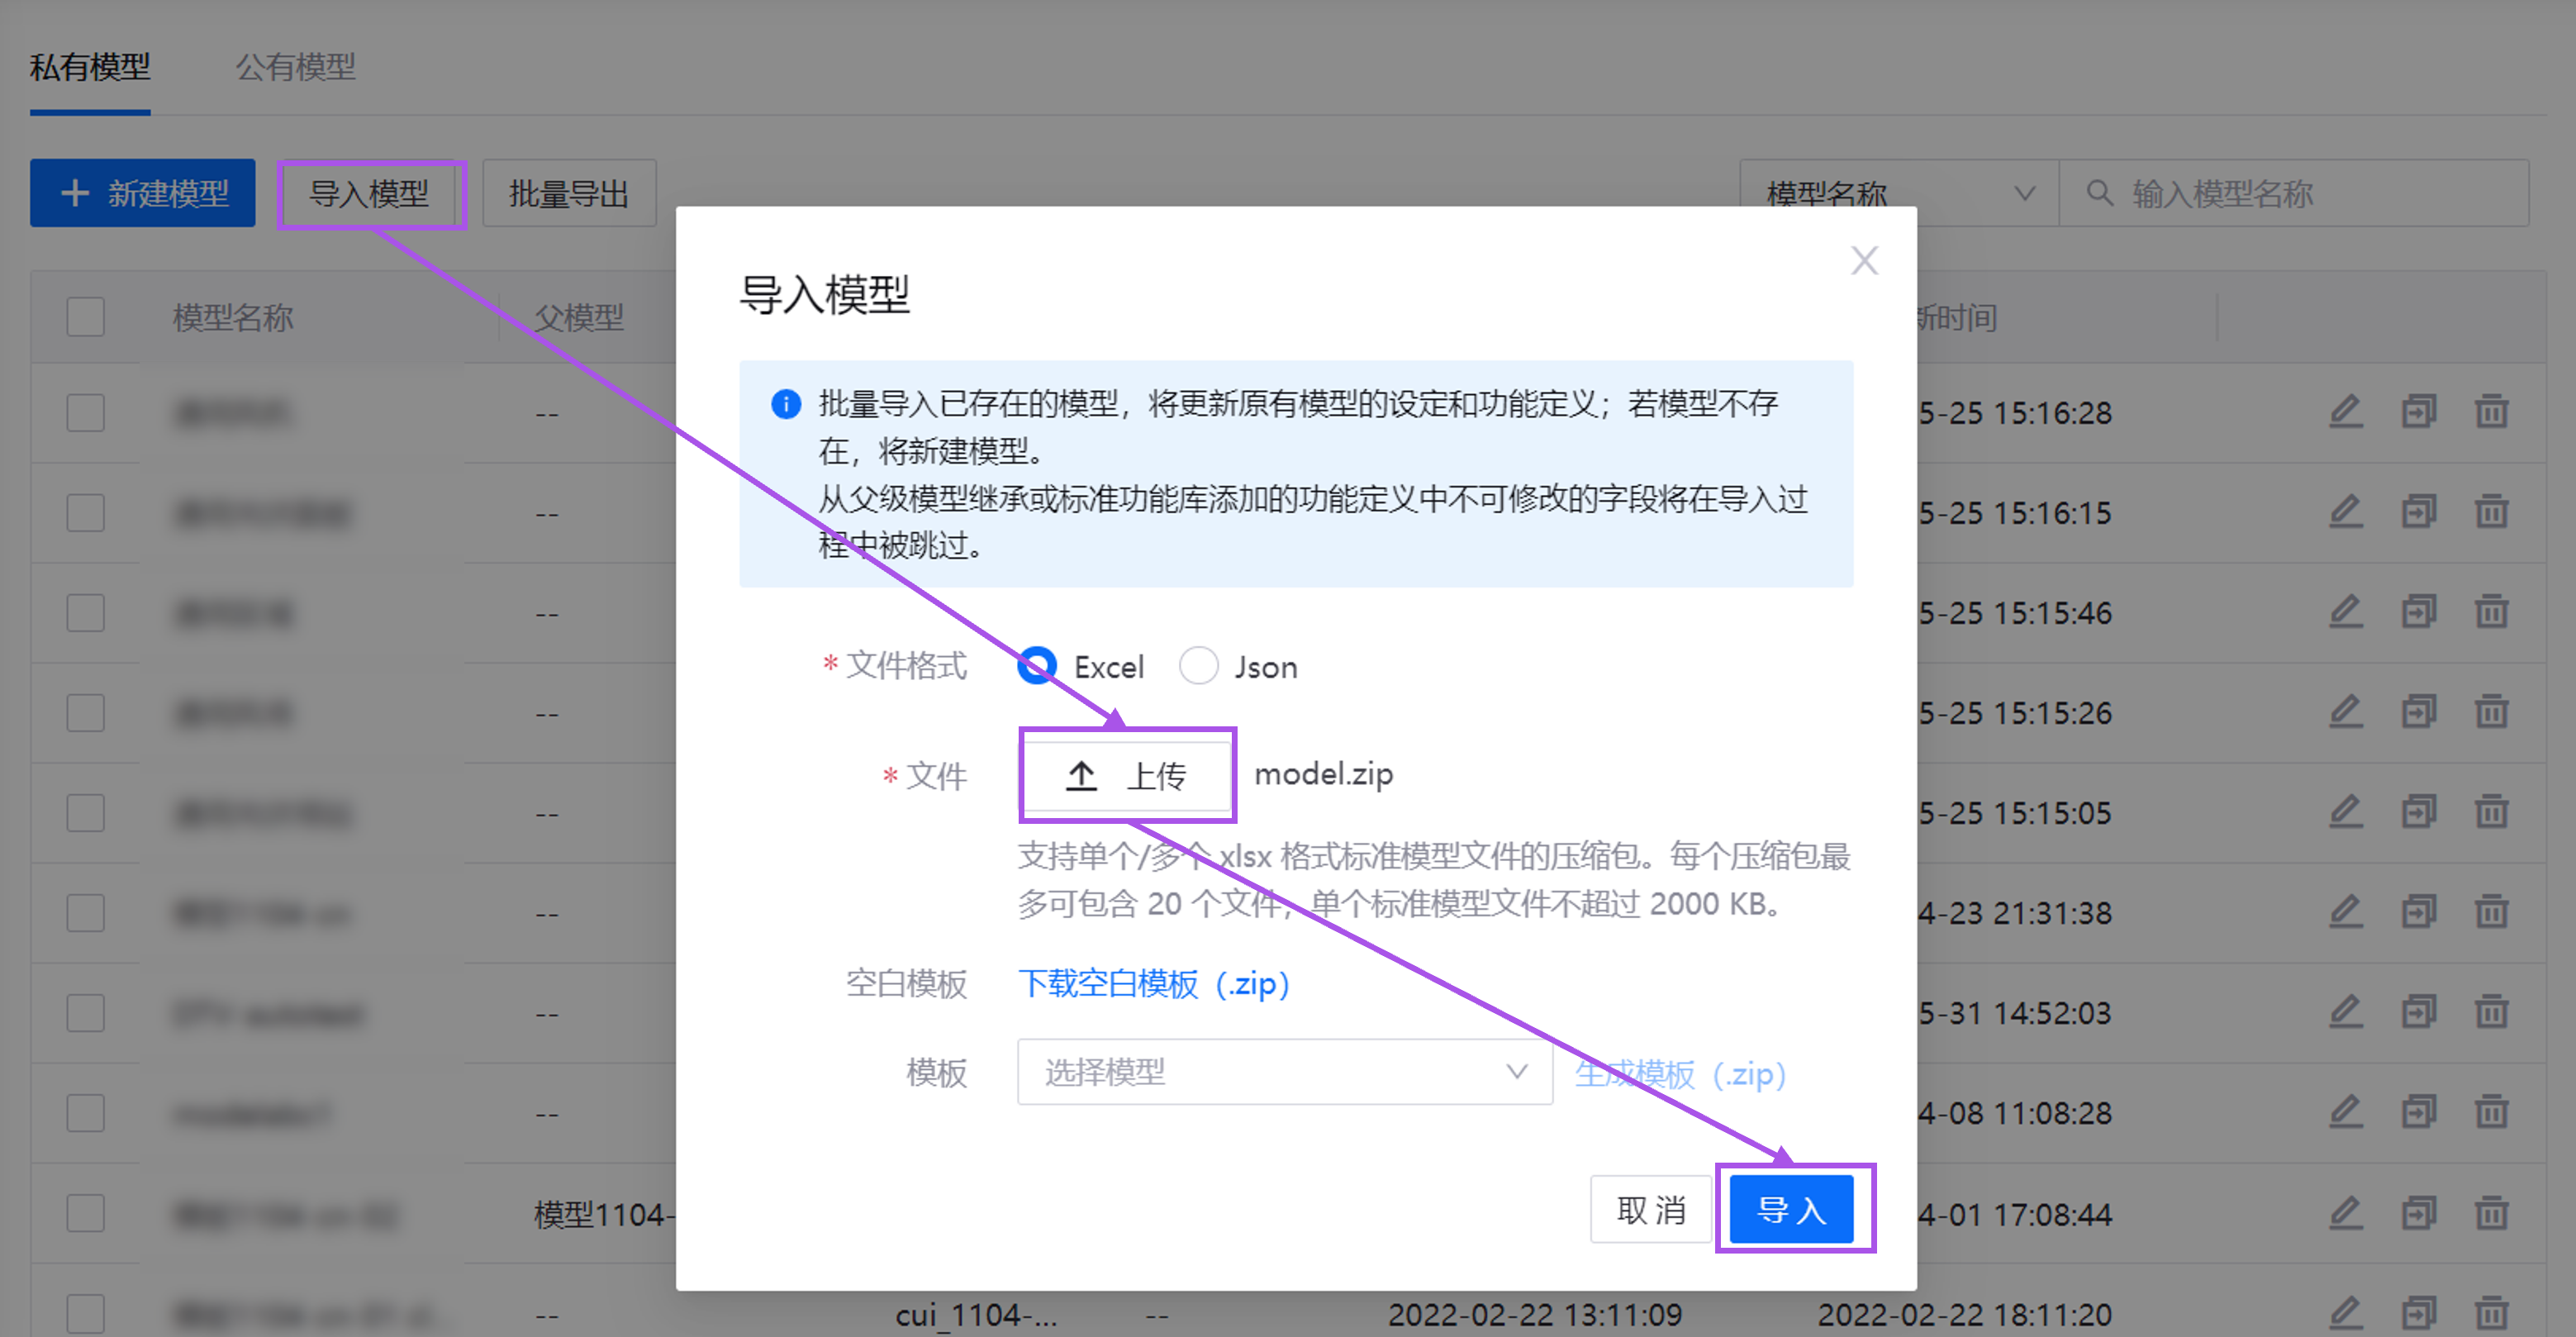
Under the Models Created in the OU tab, select Import to open the model import dialog.
Choose Excel format, click Import to upload the .xlsx file from the
modelsample folder, then select Import.Note: There are 5 model files to import.
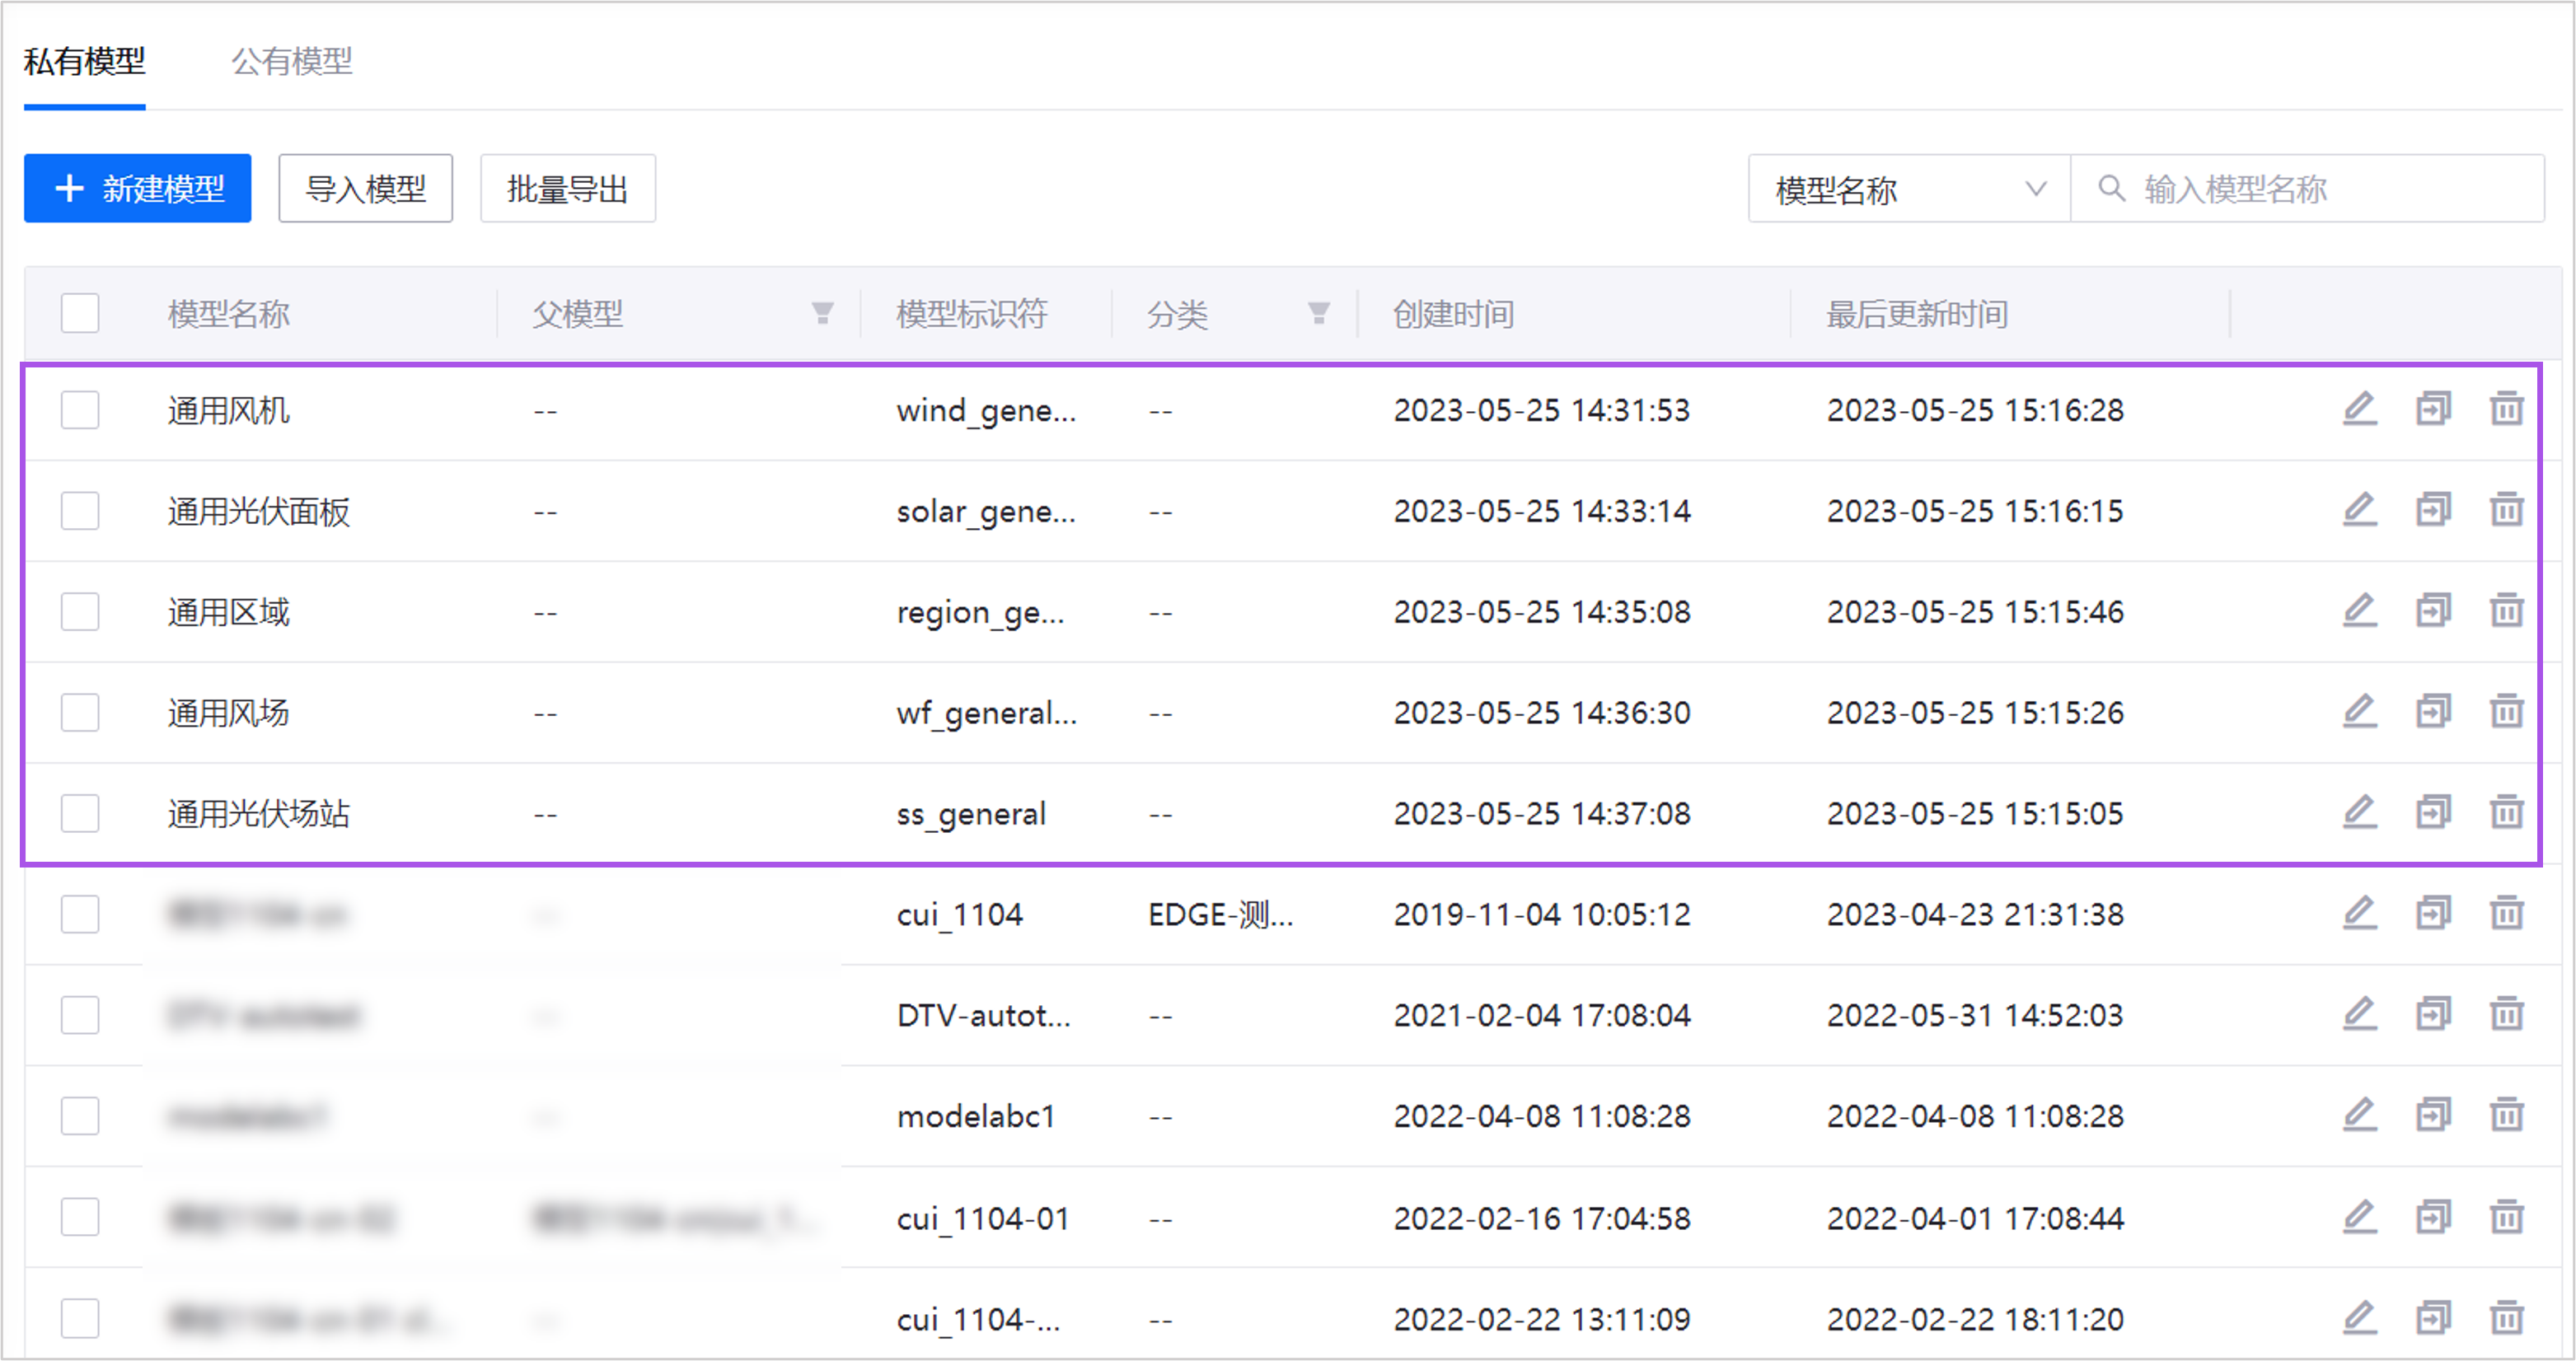
After import completes, you can view these models in the model list.
Step 3: Batch Import Products
Products are collections of devices with identical functionality, further defining IoT communication attributes like authentication methods and data formats based on models. This tutorial involves:
Product |
Model |
Description |
|---|---|---|
Generic Wind Turbine Product |
Generic Wind Turbine |
Collection of wind turbine devices in this tutorial. |
Generic Solar Panel Product |
Generic Solar Panel |
Collection of solar panel devices in this tutorial. |
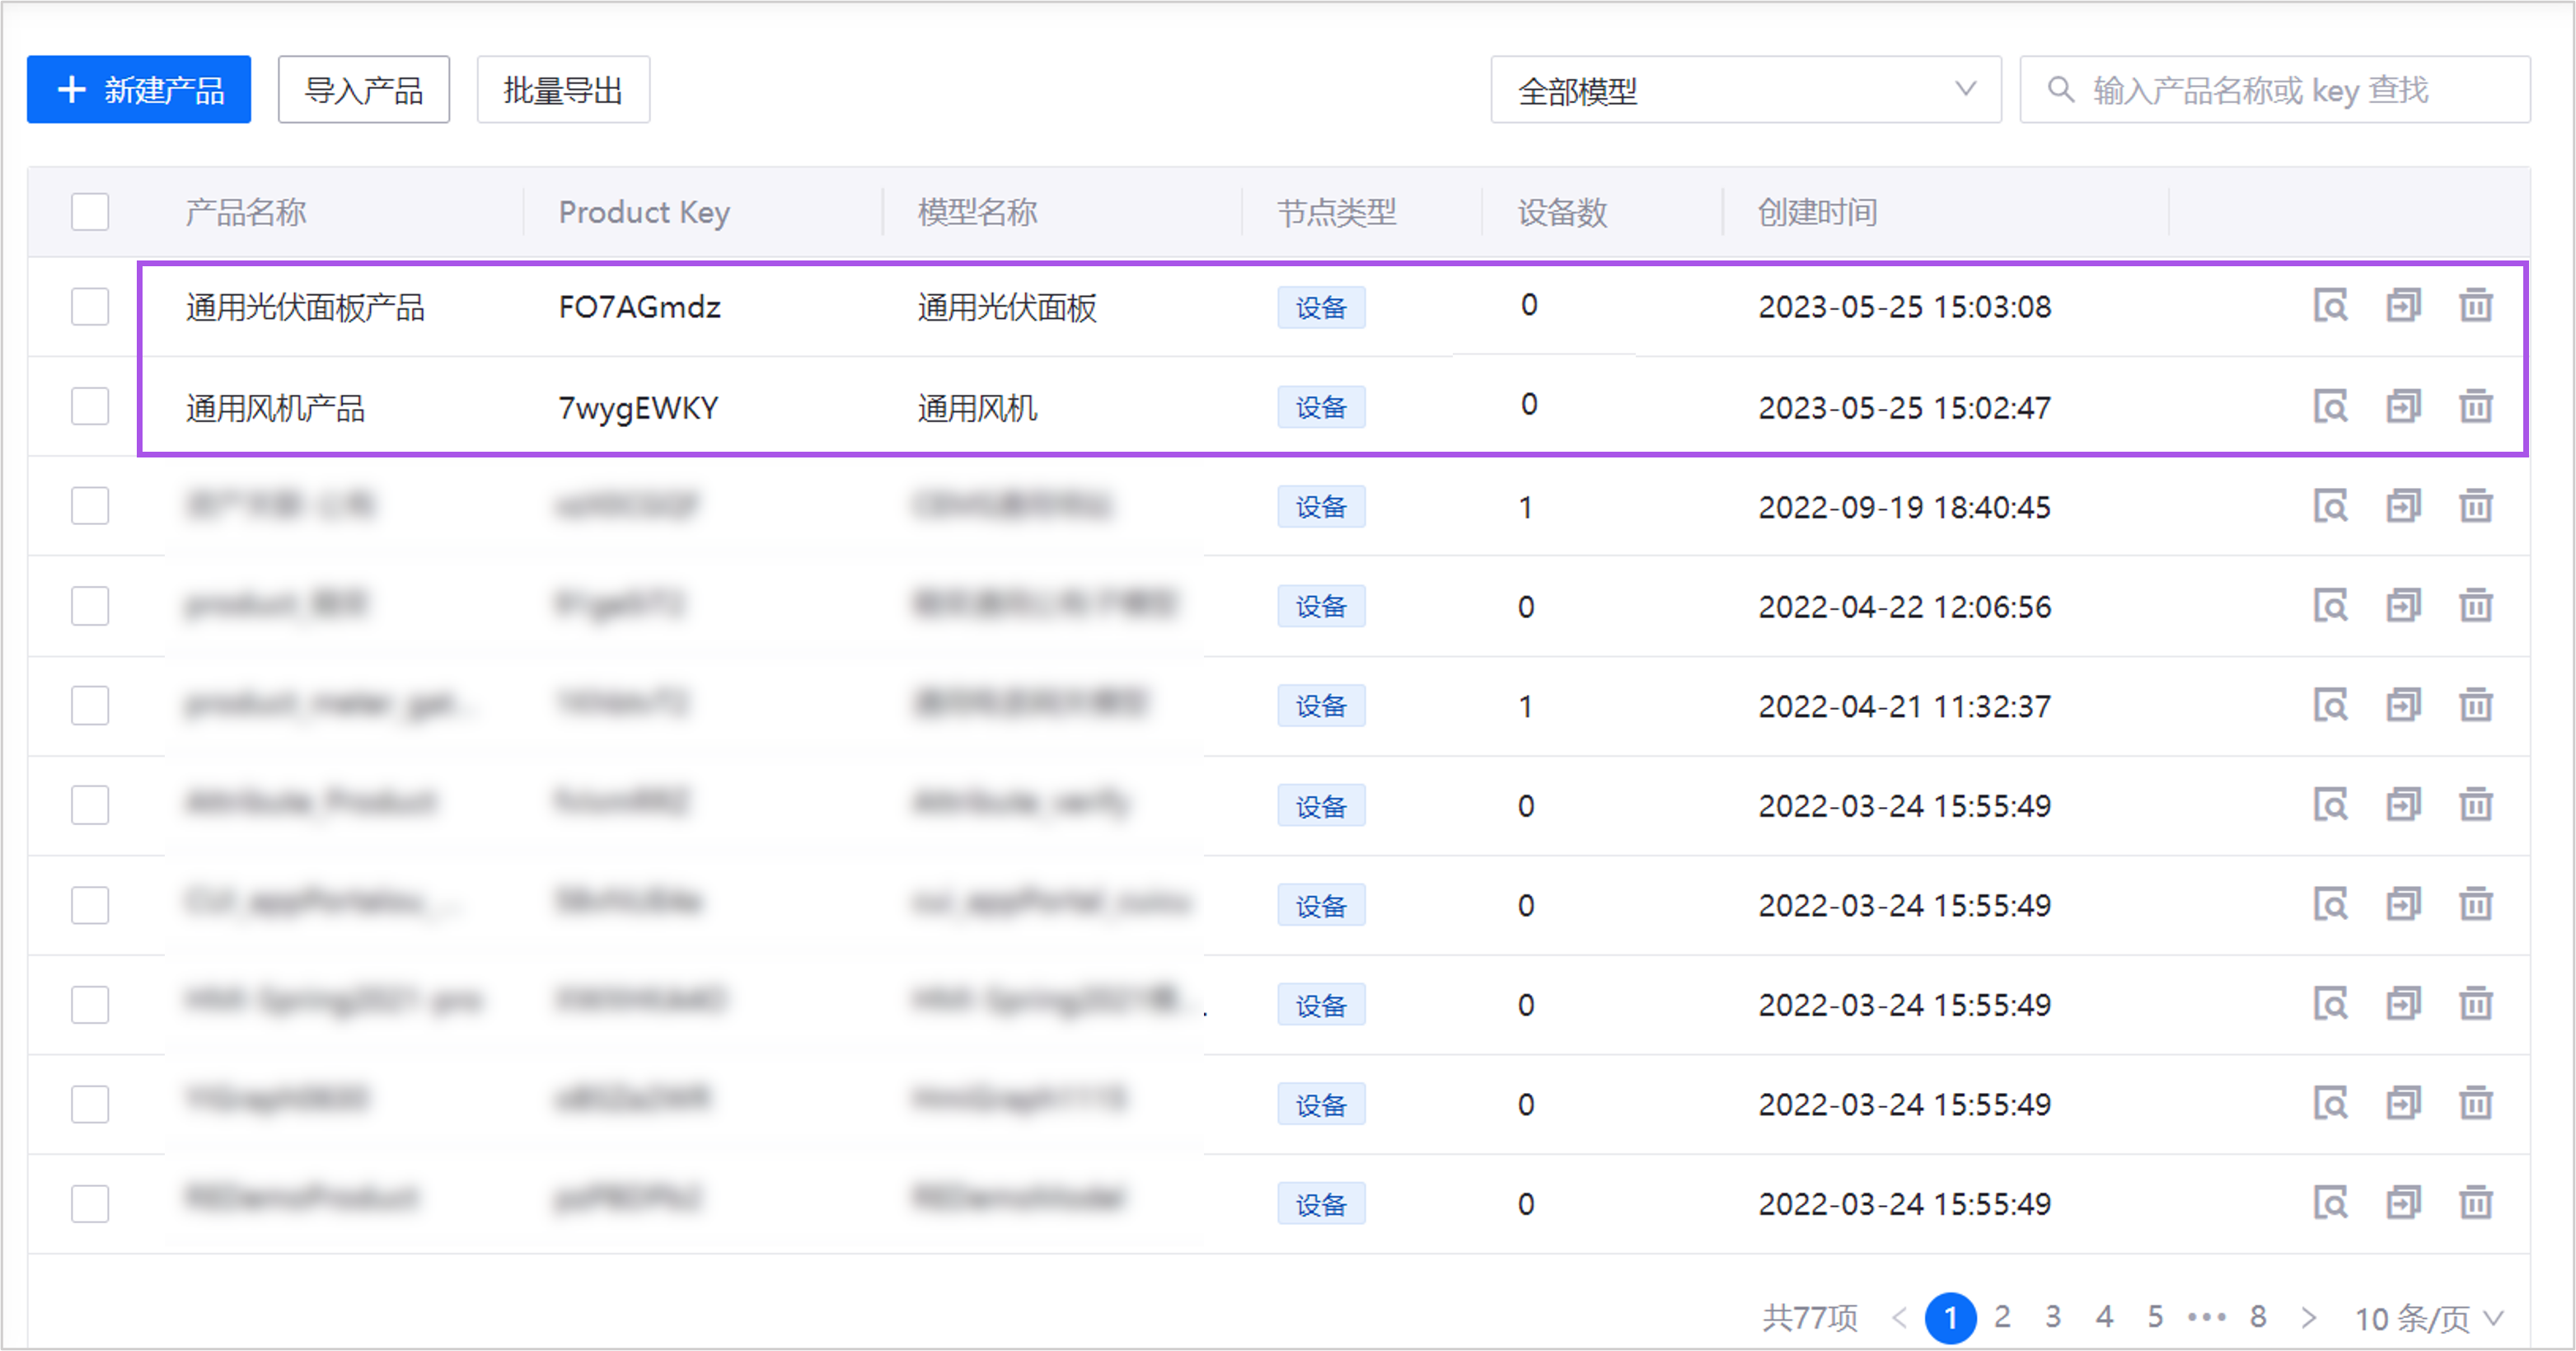
Batch import these products as follows:
Navigate to Device > Device Management > Products in Developer Portal.
Select Import to open the import dialog.
Click Upload to upload the
products.xlsxsample file, then select Import.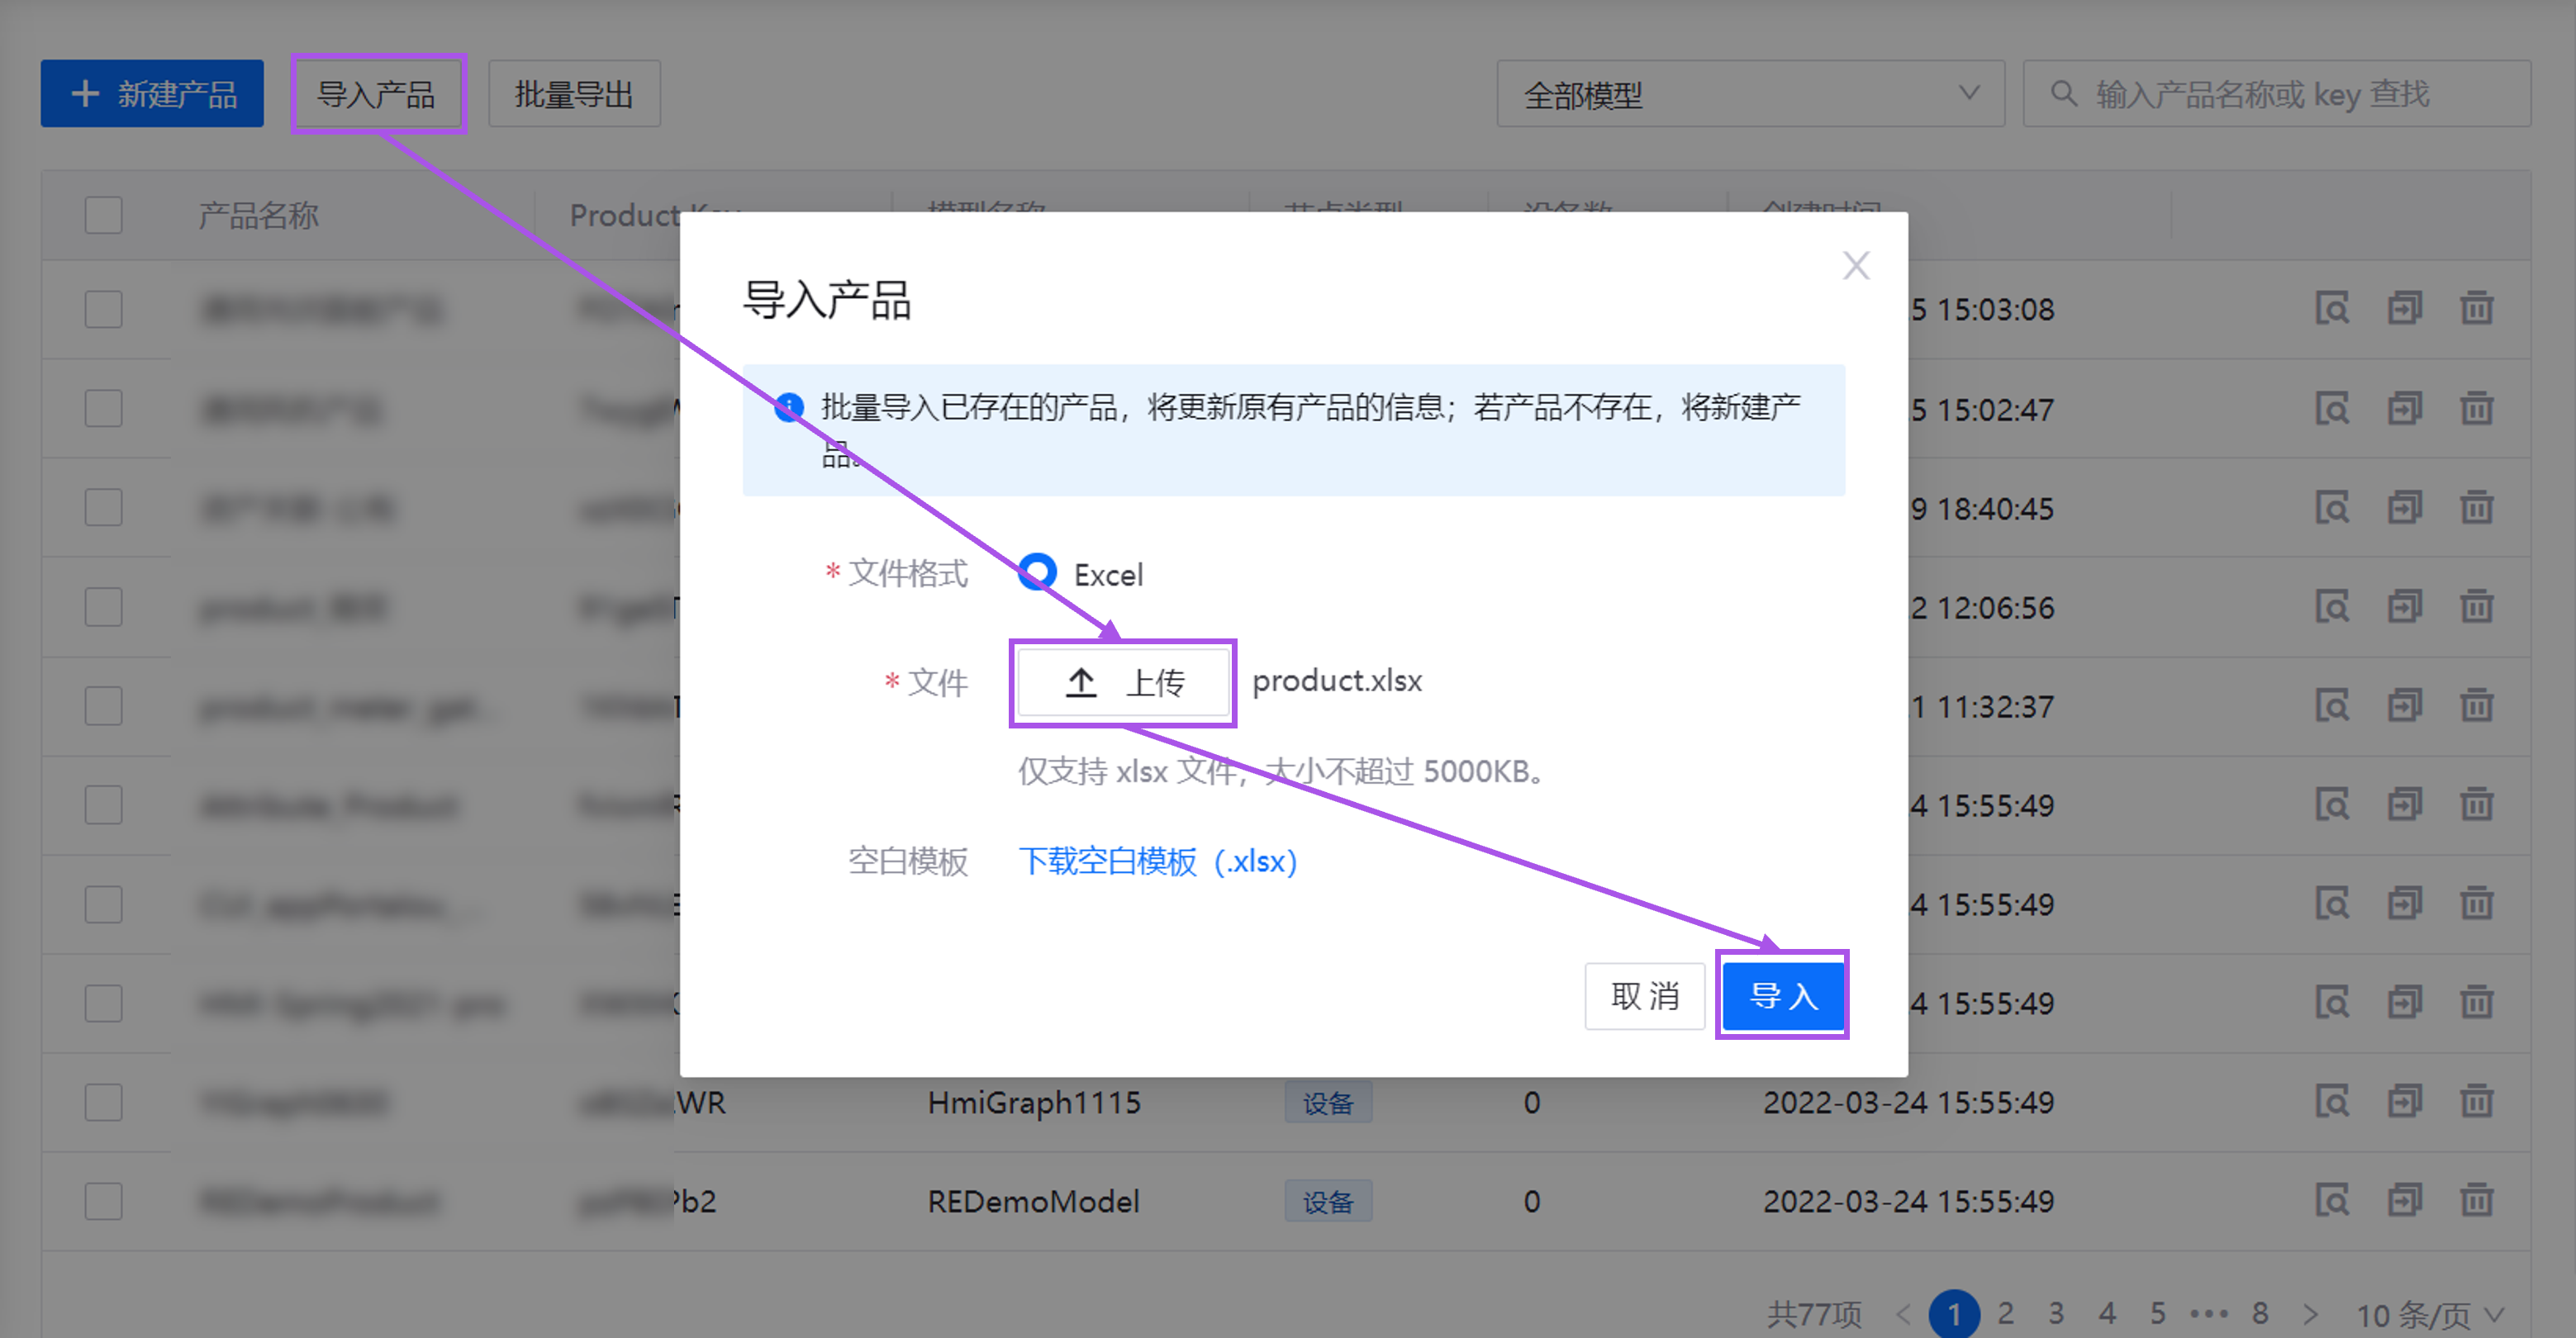
After import, view these products in the product list.
Step 4: Batch Import Device Assets
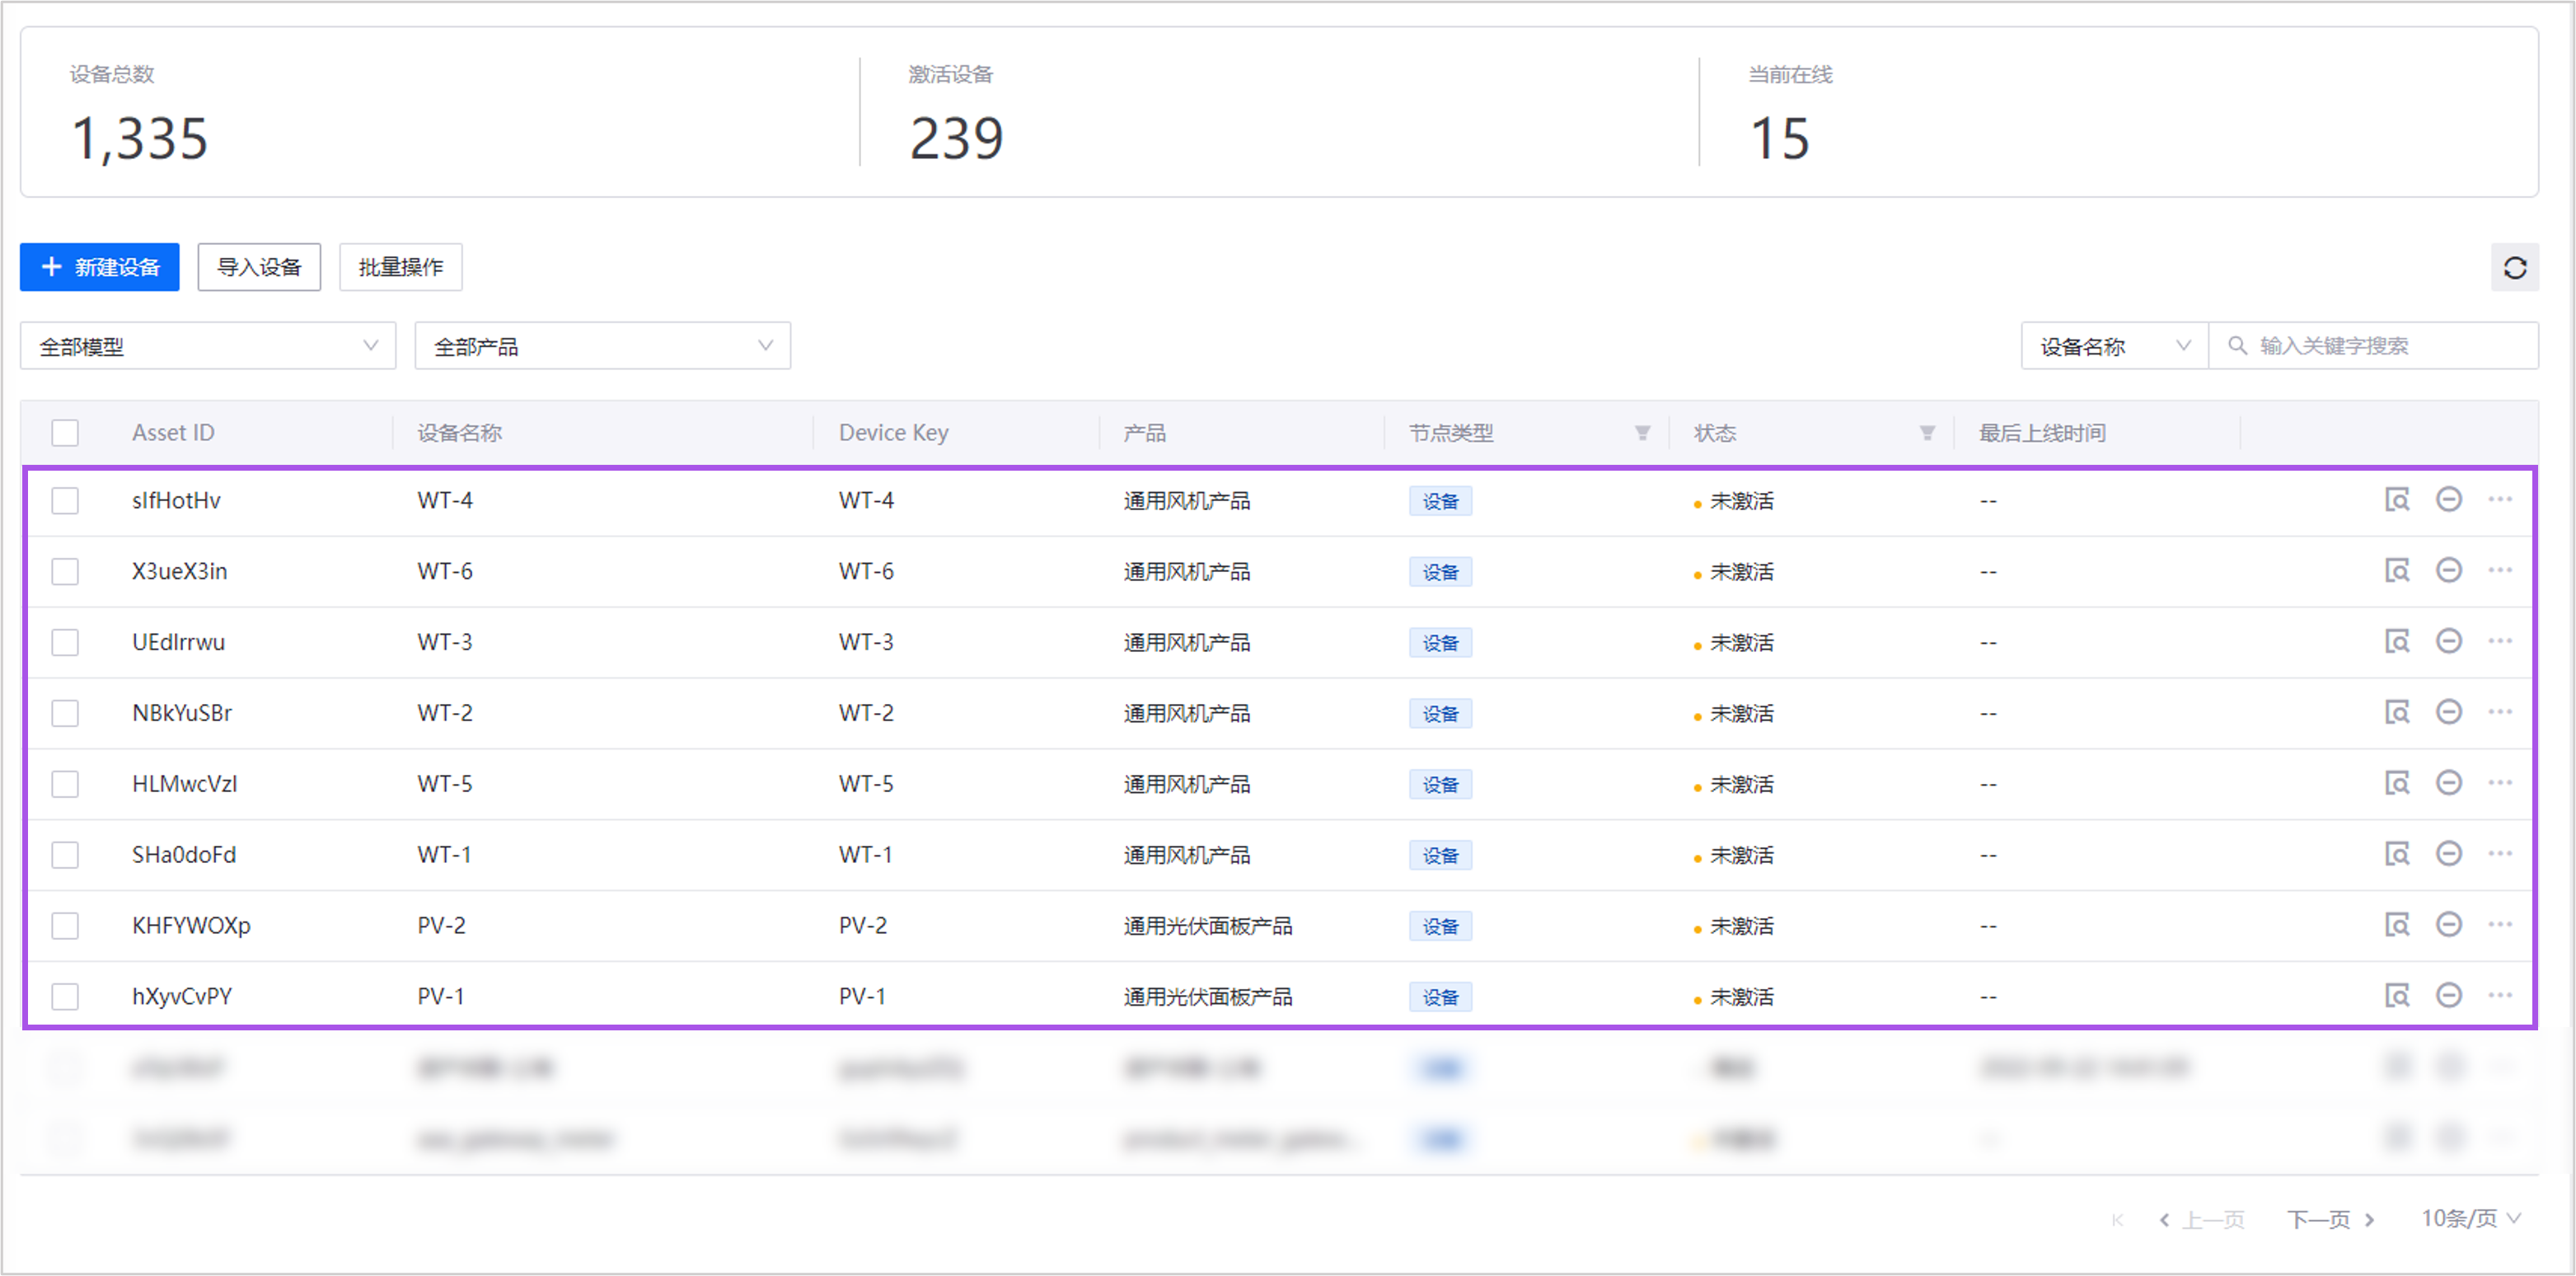
Device assets represent physical equipment in the real world. In this tutorial, they include wind turbines in wind farms and solar panels in power stations. Batch import them as follows:
Navigate to Device > Device Management > Device Assets.
Select Import to open the import dialog.
Click Upload to upload the .xlsx file from the
device assetssample folder, then select Import.Note: There are 2 model files to import.

After import, view these products in the product list.
Step 5: Batch Import Logical Assets
Logical assets represent spaces or collections containing device assets. In this tutorial, they include groups, branches, and their subordinate wind/solar farms. Batch import them as follows:
Navigate to Device > Device Management > Logical Assets.
Select Import.
Click Upload to upload the .xlsx file from the
logical assetssample folder, then select Import.Note: There are 3 model files to import.
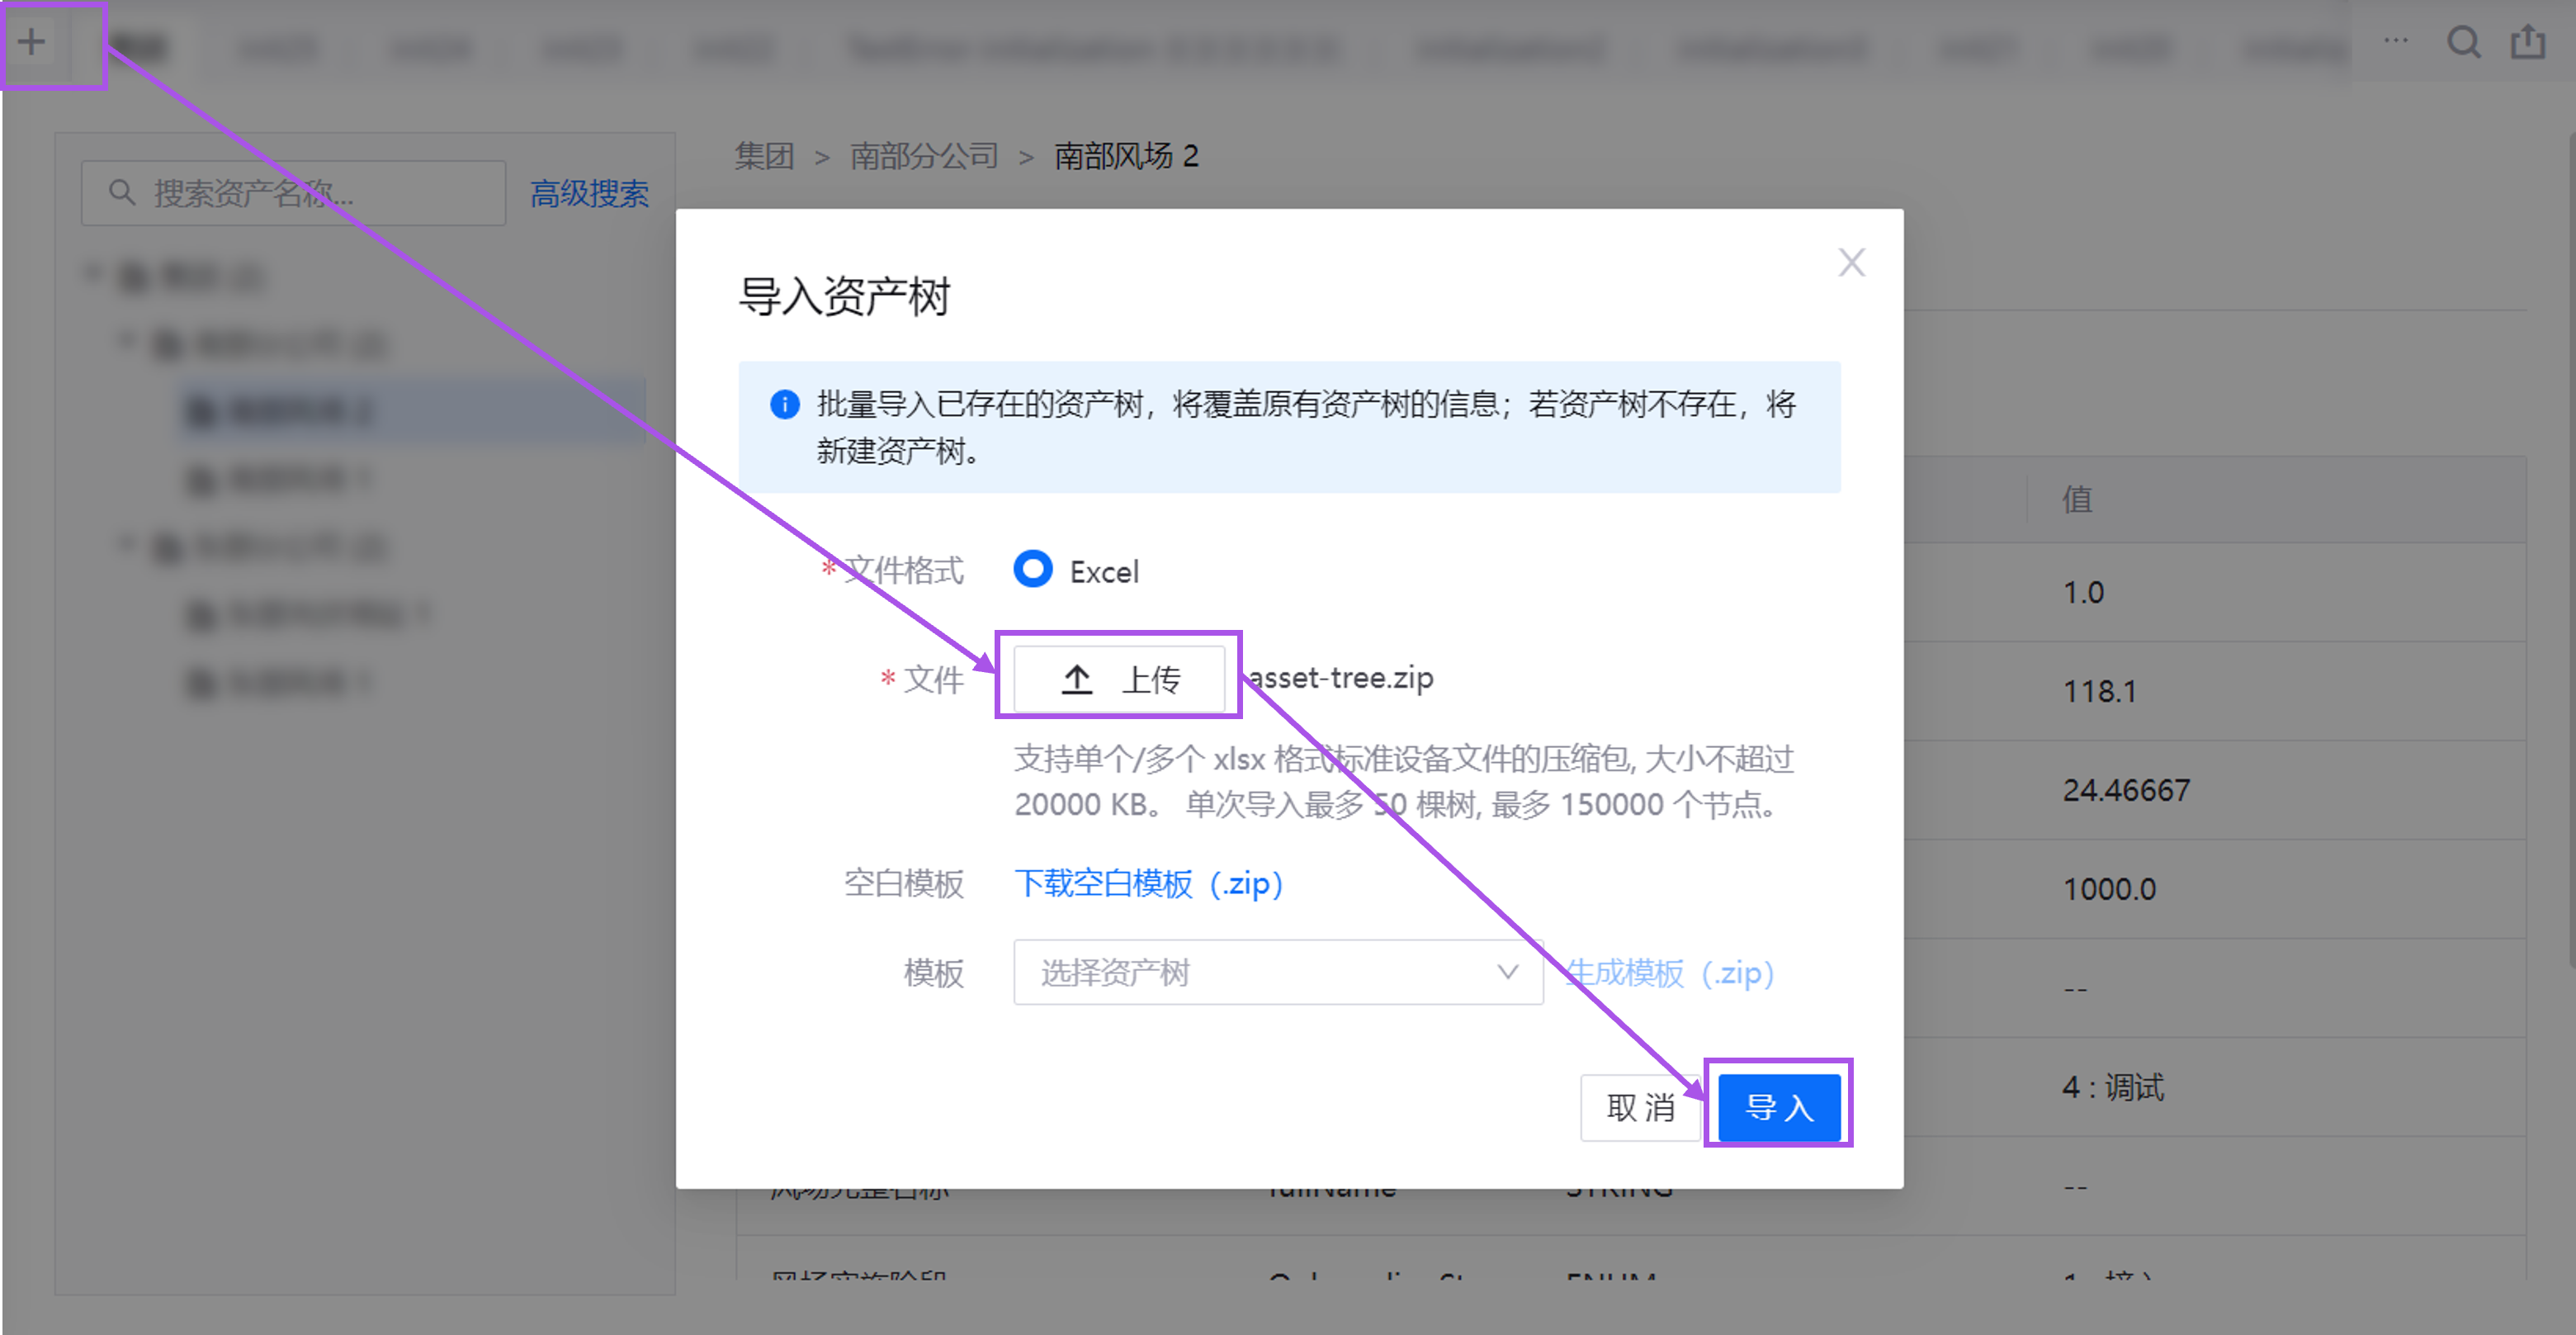
After import, view these logical assets in the list.
Step 6: Create Asset Tree
Asset trees organize hierarchical asset structures through parent-child relationships, enabling intuitive visualization of dependencies and organizational frameworks for effective management of complex systems. In this tutorial, the groups serves as the root node, connecting branches and their subordinate farms. Create the asset tree as follows:
Navigate to Device > Device Management > Asset Trees.
Hover over the plus icon (+) in the top-left corner and select New Asset Tree to open the import dialog.
Enter
Groupin the Asset Tree Name field and select Next.In the root node dialog, select Bind to Existing Asset, then Next.
In the association dialog:
Asset Type: Select Logical Asset
Model: Select Generic Region
Asset ID: Enter the group model’s asset ID
Asset Name: Enter
Group
Note: Find the group asset ID under Device > Model Management > Models.
Select Query, check the queried group asset, then Confirm.
Open details page of the group asset tree, hover over the plus icon (+) next to the root node and select Add Sub-node.
In the dialog, select Bind to Existing Asset, then Next.
Import logical assets according to this chart:
Sub-node |
Downstream sub-node |
Downstream sub-node |
|---|---|---|
Southern Branch (Model: Generic Region) |
Southern Wind Farm 1 (Model: Generic Wind Farm) |
WT-5 WT-6 |
Southern Wind Farm 2 (Model: Generic Wind Farm) |
WT-3 WT-4 |
|
Eastern Branch (Model: Generic Region) |
Eastern PV Station 1 (Model: Generic PV Station) |
PV-1 PV-2 |
Eastern Wind Farm (Model: Generic Wind Farm) |
WT-1 WT-2 |
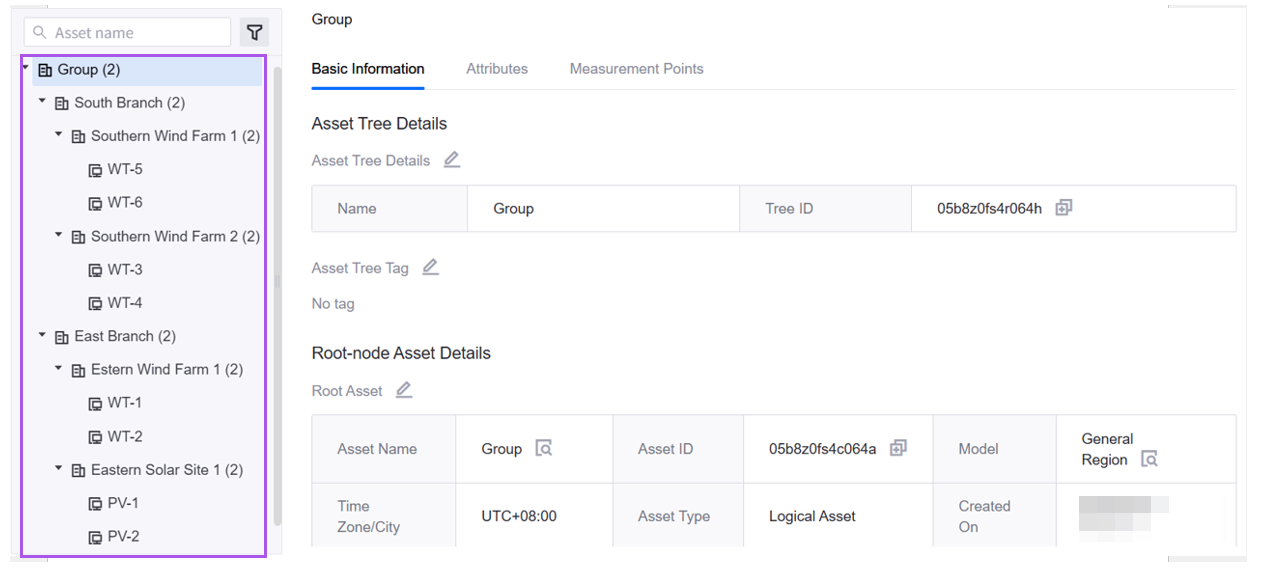
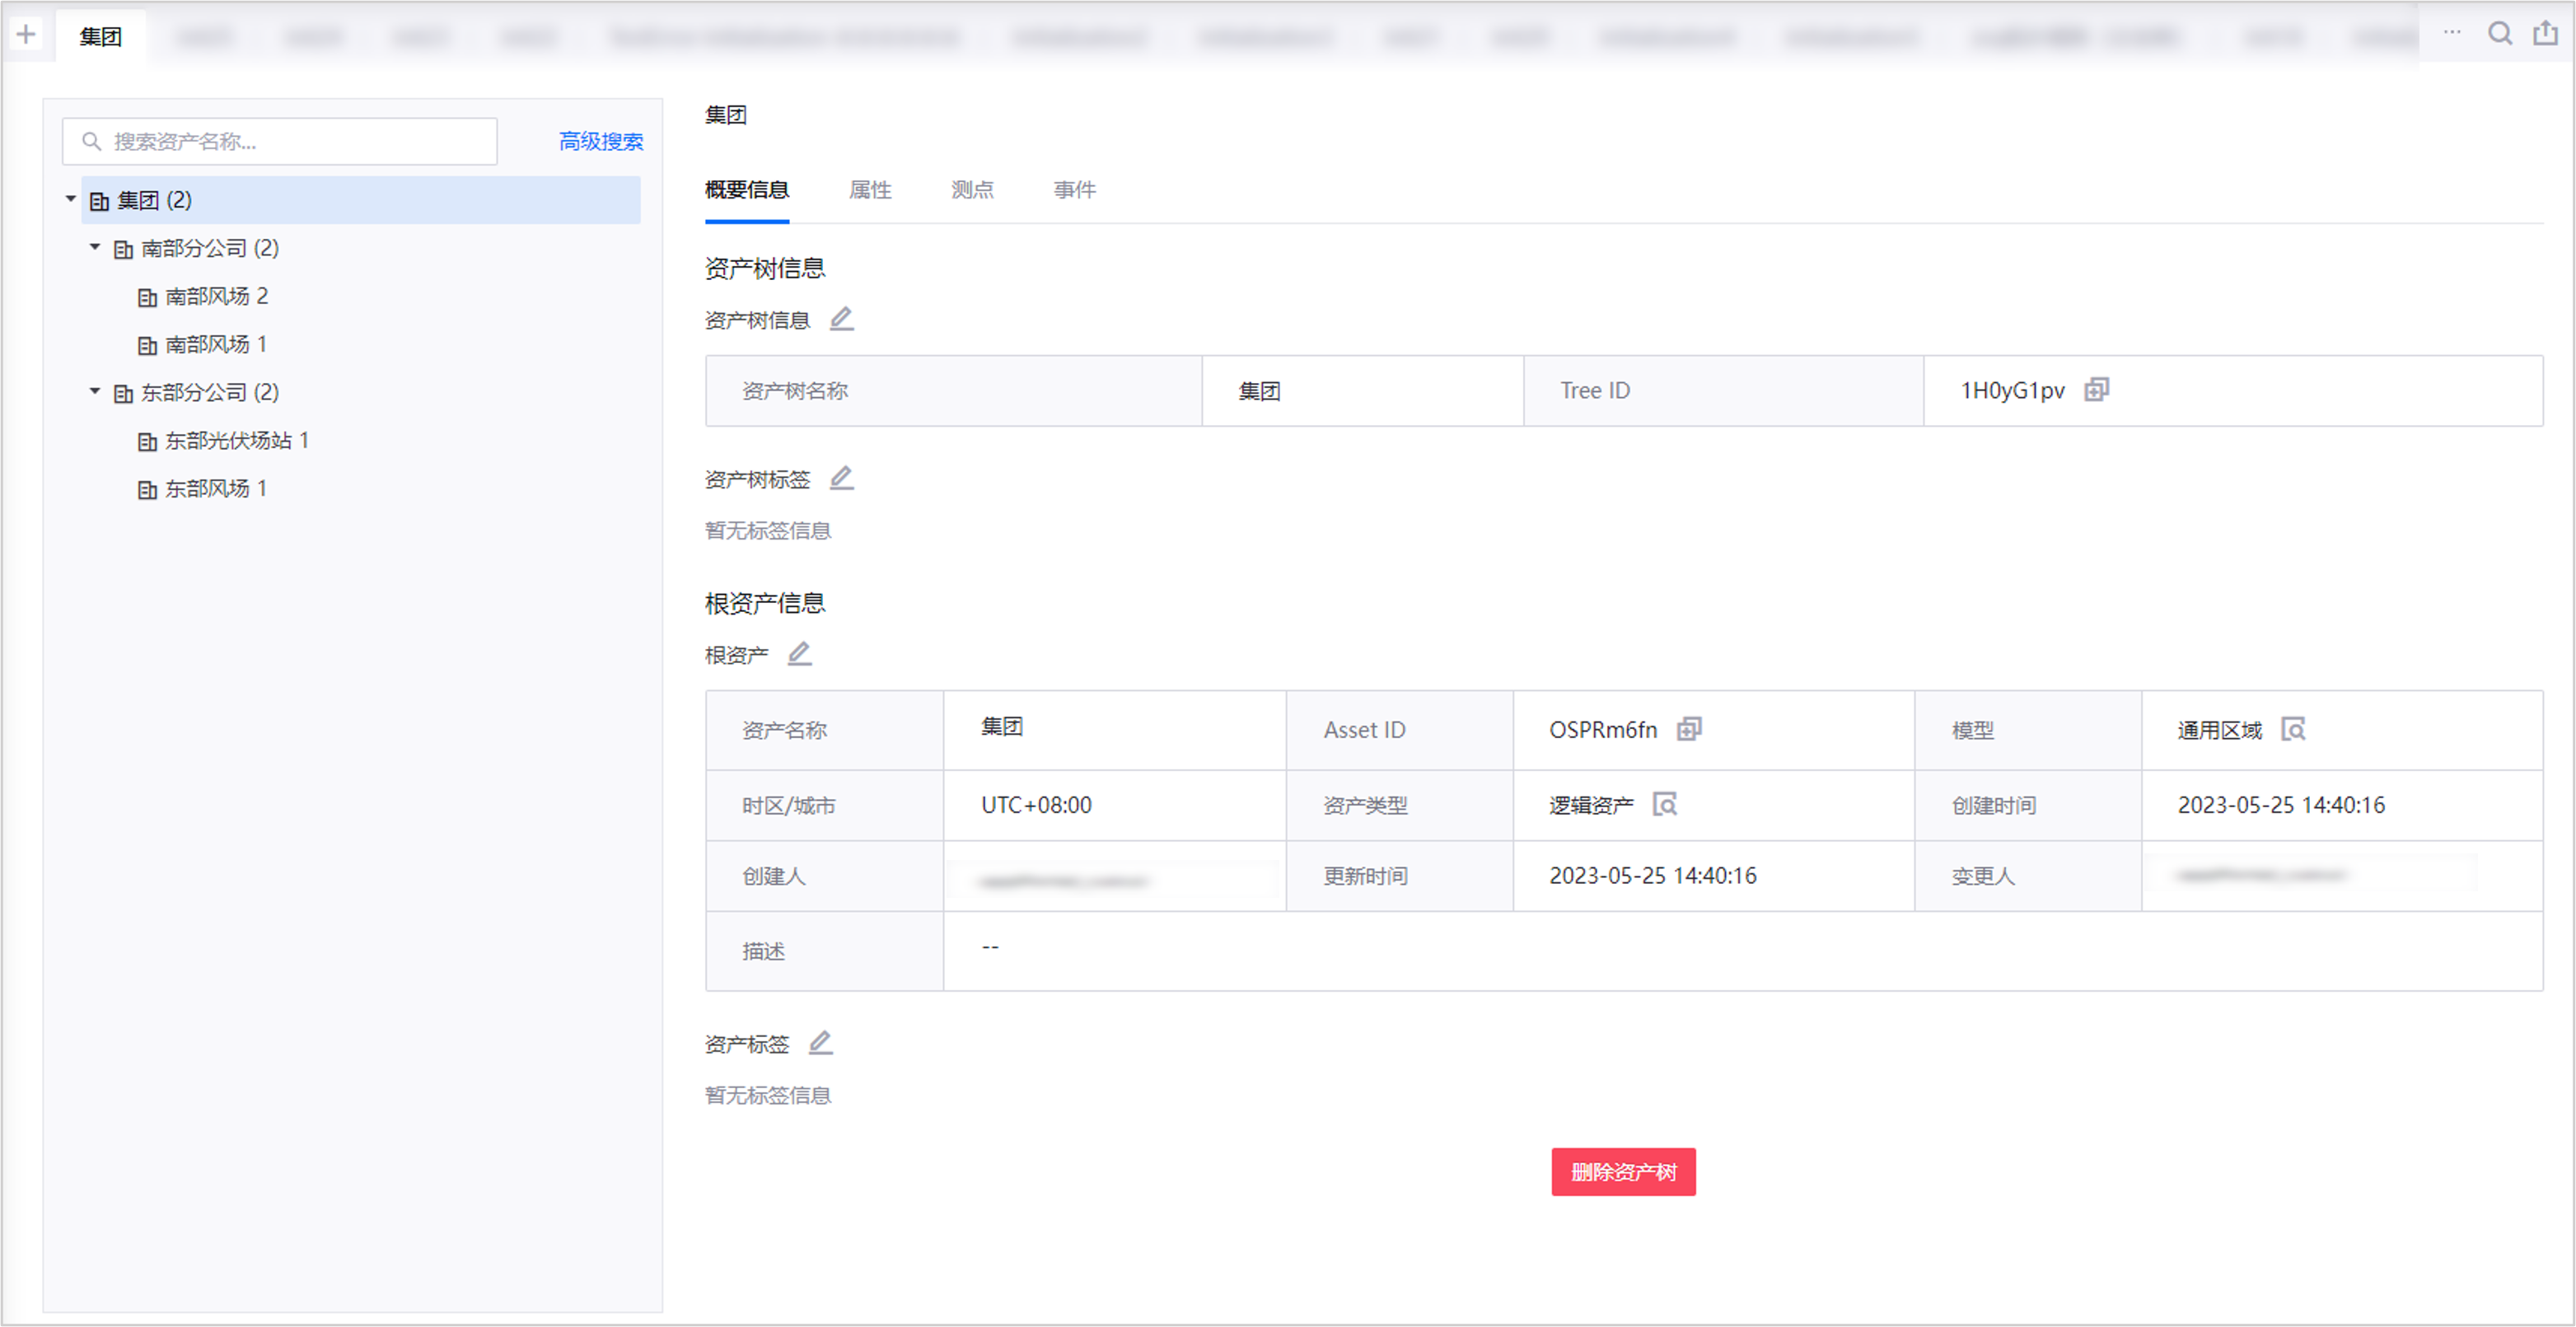
After import, select the Group asset tree tab to view the following structure: