Connecting Non-Smart Devices to EnOS Cloud via Edge
This section helps you quickly get started with provisioning sub-devices and EnOS Edge to EnOS Cloud, enabling sub-devices to connect and send data to EnOS Cloud through EnOS Edge, and view device and EnOS Edge communication information from EnOS Cloud.
Scenario Description
For more information about the connection scenario of this task, see “Scenario 2.1” in Device Registration Methods.
About This Task
In this example, an inverter will be connected to EnOS Cloud through an edge gateway. The edge gateway will collect data from the inverter and send them to EnOS Cloud as a proxy. The overall connection scenario is shown in the flowchart below:
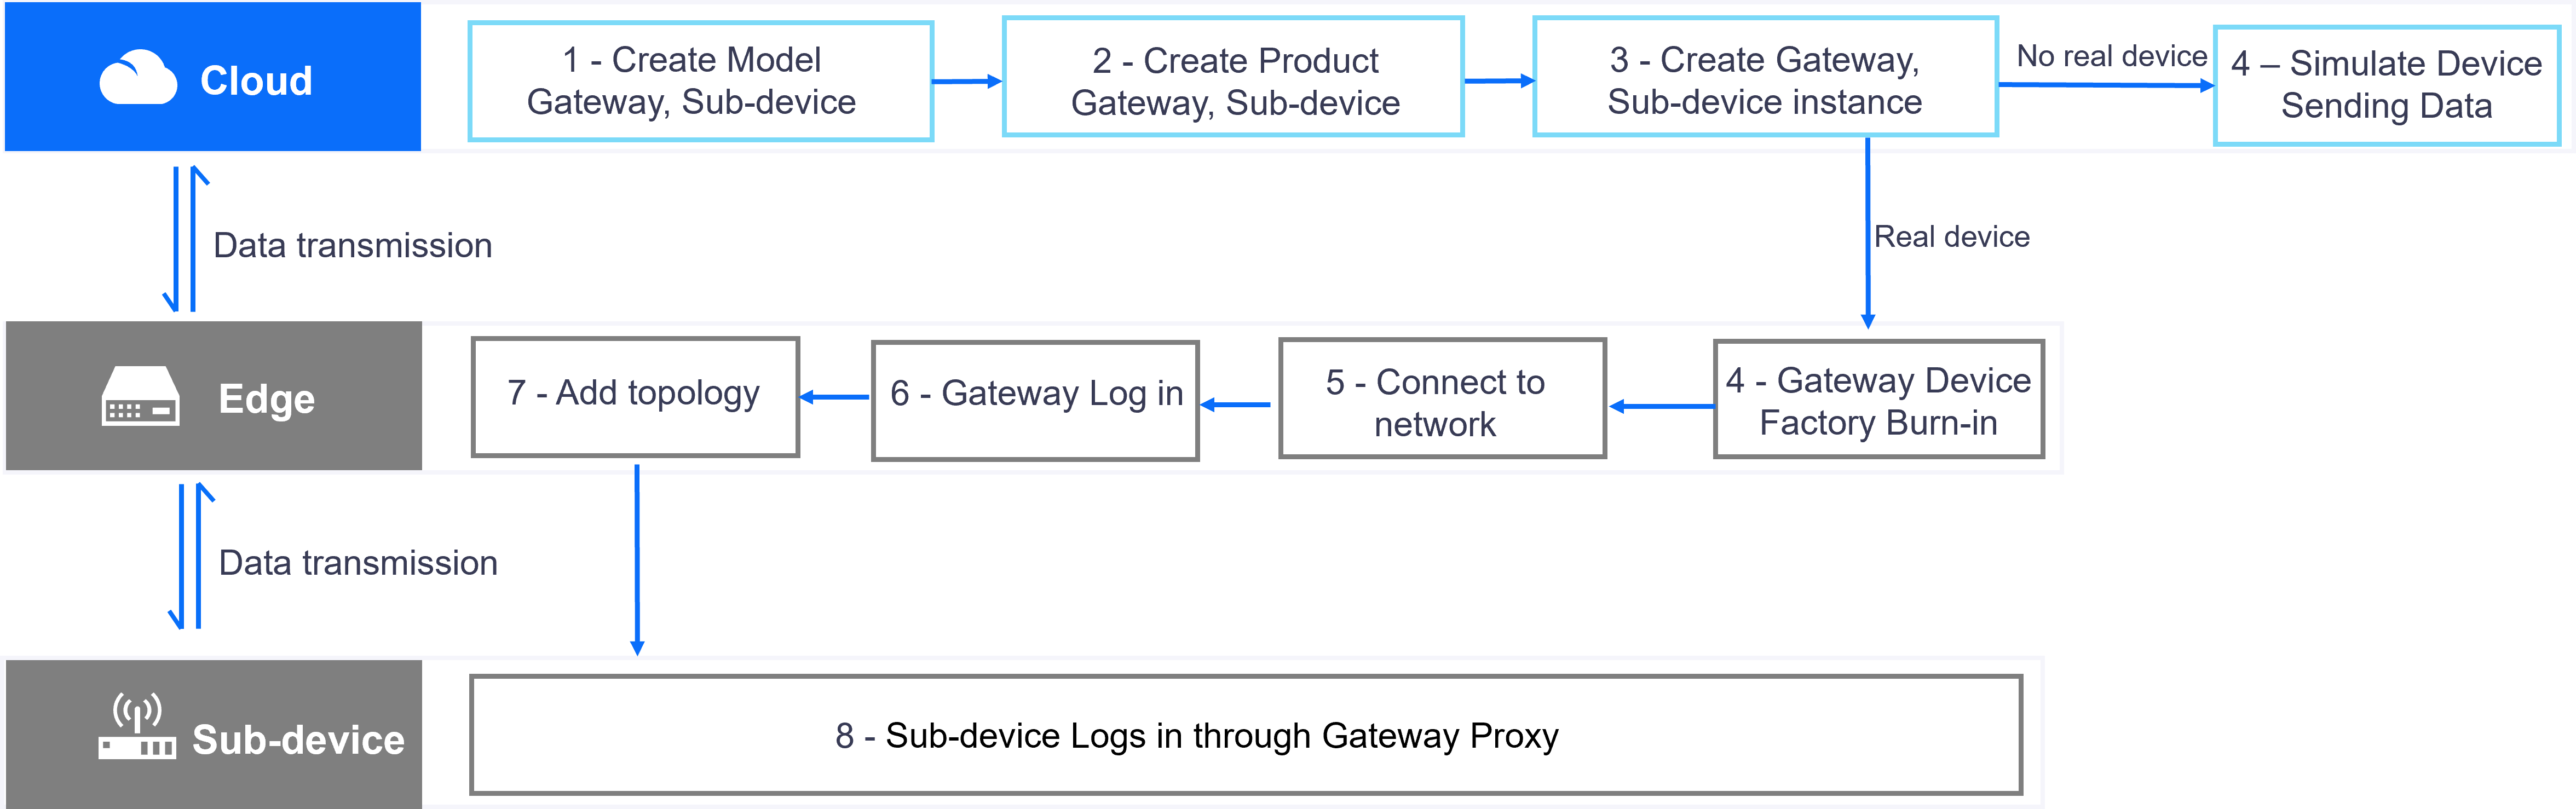
The procedure has the following steps:
Creating a device model
Creating a product
Registering a device
Using device SDK to simulate the sending of data via EnOS Edge as a proxy of sub-device
Checking device communication status
Checking device data
Prerequisites
Ensure that you have the Developer role to access the Developer Console in EnOS Application Portal. Contact your OU administrator for role assignment.
Complete sub-device registration by following Steps 1-3 in Connecting Smart Devices to EnOS Cloud.
Step 1: Creating a Device Model
Create an Edge device model called Edge_Model, with the assumption that there are no reusable edge device models.
In EnOS Application Portal > Developer Console, click Model Management > Models from the left navigation menu.
Follow Creating a Model from Scratch to create a new model with the following details:
Group: Custom (custom)
Name: Edge_Model
Business Identifier: Edge_Model_0
Model Usage: Device Connection
Description: Edge Model
Note
Ensure Device Connection is selected under Model Usage; otherwise, the model cannot be used for product creation and device registration.

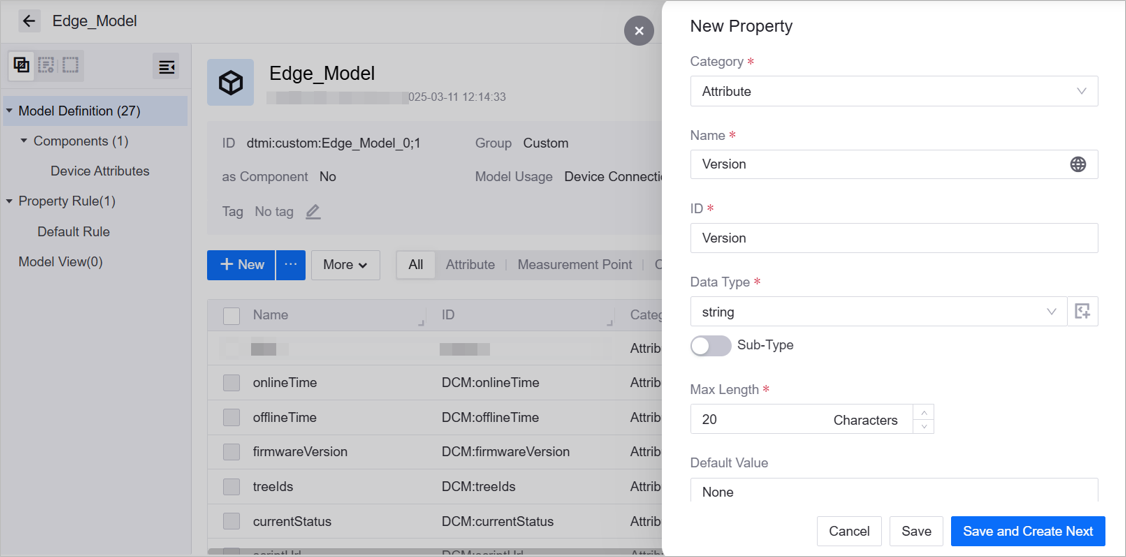
On the model details page, create the following attribute by referring to Creating Model Elements:
Type: Attribute
Name: Version/Version
ID: version
Data Type: string
Max Length: 20
Default Value: None
Is Required: Yes
IS Writable: Yes
Click Save at the bottom to complete attribute creation.
This model can now be used to create products and register devices.
Step 2: Creating a Product
Create a product called Edge_Product with the assumption that the EnOS Edge devices transmit data using the EnOS IoT standard format without CA certificate encryption.
In EnOS Application Portal > Developer Console, select Device Management > Products.
Click New Product, and provide the following settings in the New Product window:
Product Name: Edge_Product
Asset Type: Gateway
Model: Edge_Model
Onboarding Method: EnOS IoT Only
Protocol Gateway: Disabled
Certificate-based Authentication: Disabled
Description: Edge Product
Click OK to complete the operation.
For more information about products, see Creating a Product.
Step 3: Registering a Device
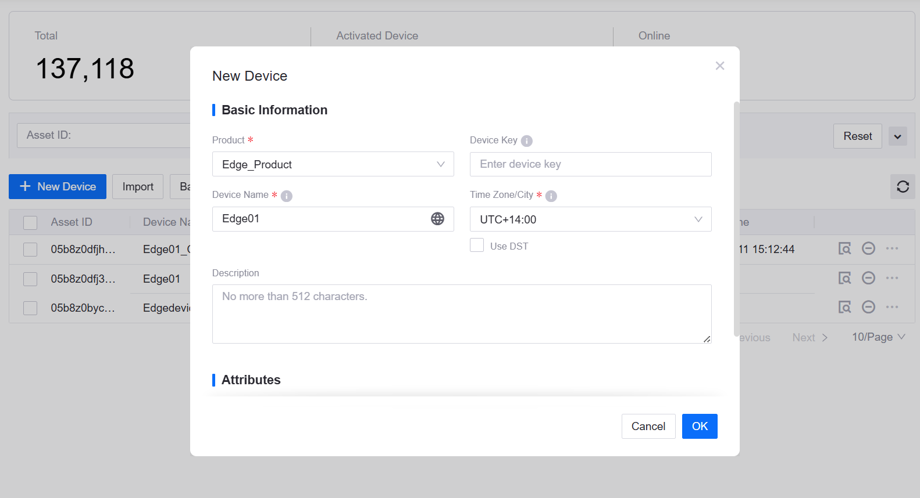
Create an edge device named Edge01, which belongs to the Edge_Product product model created in the previous step.
In EnOS Application Portal > Developer Console, select Device Management > Device Assets.
Click New Device, and provide the following settings in the New Device window:
Basic Information:
Product: Edge_Product
Device Name: Edge01
Timezone/City: UTC+14:00
Attributes:
Version: 1.0.0
Click OK to complete the operation.
After creation, the device appears in the list. Click  to access device details and obtain the device credentials (
ProductKey, DeviceKey, DeviceSecret), which will be used in subsequent steps.
For more information about products, see Creating a Product.
Step 4: Using Device SDK to Simulate Data via EnOS Edge as a Proxy of Sub-Device
In this step, you will simulate sending inverter active power data to the cloud via the Device SDK.
Obtain the Device SDK. For details, refer to the SDK’s GitHub Readme File.
Configure EnOS Cloud connection according to the steps in Readme.
Configure the credentials (
ProductKey,DeviceKey,DeviceSecret) of both EnOS Edge and the sub-device in the sample connection program.Modify the postSubMeasurepoint method to specify the measurepoint name. In this case, set it to INV.GenActivePW for inverter active power, along with corresponding values.
Execute the following sample methods:
EnOS Edge Online Connection: In the following sample code,
environment_addressis the address of EnOS Cloud, and theproductKey,deviceKey, anddeviceSecretare the device triple of the edge gateway.public static void initWithCallback() { System.out.println("start connect with callback ... "); try { client = new MqttClient(environment_address, productKey, deviceKey, deviceSecret); client.getProfile().setConnectionTimeout(60).setAutoReconnect(false); client.connect(new ConnCallback() { public void connectComplete(boolean reconnect) { System.out.println("connect success"); } public void connectLost(Throwable cause) { System.out.println("onConnectLost"); } public void connectFailed(Throwable cause) { System.out.println("onConnectFailed : " + cause); } }); } catch (Throwable var1) { } System.out.println("connect result :" + client.isConnected()); }
Add Sub-Device Topology to EnOS Edge, replace
"sub_pk","sub_dk","sub_ds"with the sub-device credentials.public static void addTopo() throws Exception { System.out.println("start add topo ..."); TopoAddRequest request = (TopoAddRequest)TopoAddRequest.builder() .addSubDevice(new SubDeviceInfo("sub_pk", "sub_dk", "sub_ds")).build(); TopoAddResponse rsp = (TopoAddResponse)client.publish(request); System.out.println("-->" + rsp); getTopo(); subDeviceLogin(); // EnOS Edge acting as proxy for sub-device login }
EnOS Edge Proxy Sub-Device Data Transmission, this example sends random float values to the INV.GenActivePW measurepoint.
public static void postSubMeasurepoint() {
   Random random = new Random();
   System.out.println("start post sub device measurepoint ...");
   MeasurepointPostRequest request = (MeasurepointPostRequest)((MeasurepointPostRequest.Builder)
       MeasurepointPostRequest.builder()
           .setProductKey("sub_pk")
           .setDeviceKey("sub_dk"))
           .addMeasurePoint("INV.GenActivePW", random.nextFloat()).build();

   try {
       MeasurepointPostResponse rsp = (MeasurepointPostResponse)client.publish(request);
       System.out.println("-->" + rsp);
   } catch (Exception var3) {
       var3.printStackTrace();
   }
}
For more information, see Java SDK README.
Step 5: Checking Device Status
In EnOS Application Portal > Developer Console, click Device Management > Device Assets. Check the status of Edge01 and its sub-device, ensuring they show Online.
Step 6: Checking Device Data
In the device list, locate the sub-device and click the View |view|icon to access its details page.
Click the Measurement Points tab, select the INV.GenActivePW measurement point, and click the View Data icon to open the Data Insights page.
Alternatively, use the TSDB Data Service to retrieve the latest data.