Quickstarts
This article introduces how OU administrators and developers authorize custom application permissions and native application permissions in the EnOS Application Portal.
Authorizing EnOS Native Applications
Method One: Authorizing Predefined Developer Roles
A developer is a role that has access to the Developer Console in the EnOS Application Portal. In the EnOS Application Portal, two predefined developer roles are available. Assigning these predefined roles to users can quickly grant them the necessary permissions. The two roles are Device Access and Management (ID: DCMadmin) and Application Developer (ID: APPdev). You can follow the steps below to assign predefined developer roles to users:
Prerequisites
Before you start, ensure the following:
You have been granted OU administrator permissions.
For more information on authorizing OU administrators, contact the tenant administrator.
Step 1: Assign Permissions to Users
Log in to the EnOS Application Portal, hover over the Console icon
 on the right side of the top toolbar, and select Admin Console.
In the left navigation pane of the Admin Console, select Users.
Find your username and select Manage
 .
.On the User Details page, select Assign Role, choose DCM Admin and App Developer from the popup window, and select Confirm.
Note
DCM Admin has device access-related application permissions, while App Developer has application development and data management-related application permissions.
After the user gains access to the Developer menu group, they can access EnOS native applications from the left menu bar in the Developer Console and manage EnOS native application permissions from Admin Console > Application Management > Developer Console Management. For more information on managing user permissions, see Managing Users.
Method Two: Creating Developer Roles
If you need to control developer permissions in a more granular manner, you can create a developer role and customize the access permissions for EnOS native applications. This section uses the Notification Management application as an example.
Prerequisites
Before you start, ensure the following:
You have been granted OU administrator permissions and developer role permissions.
Step 1: Configure Menu Groups
A menu group is a collection of application menus that users can use to access various functional pages within an application. Follow the steps below to configure the menu group for the application shortcut:
In the left navigation pane of the EnOS Application Portal Admin Console, select Application Management > Developer Console Management.
Select the Manage Menu Groups
 of the application you need to manage.
Select the plus sign icon + from the Menu Group list, enter
Reference1as the name of the new menu group, and select Submit.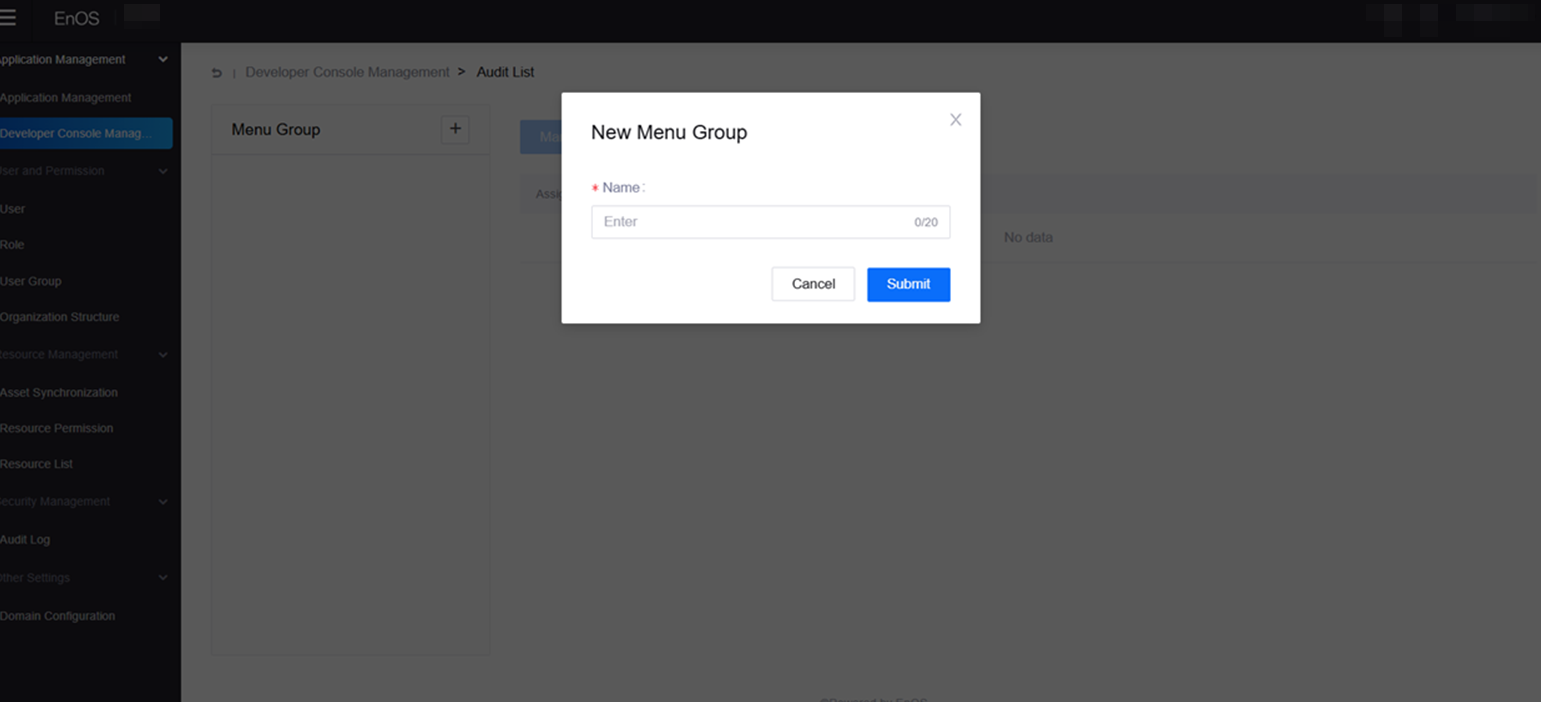
Select the Configuration Menu, check the required menus, and choose Confirm. (This tutorial selects all menus for this application.)
For more information on menu groups, see Managing Menu Groups.
Step 2: Assign an Organization Structure to the Application (Optional)
An organization structure, based on nodes, displays the hierarchical relationships within an OU based on factors such as function or region. Follow the steps below to create an organization structure and assign it to the application:
In the left navigation pane of the EnOS Application Portal Admin Console, select Organization Structure.
Select New Organization Structure, enter
Application Portal 1as the name of the organization structure, and select Submit.In the left navigation pane, select Application Management.
Select the Assign Organization Structure
 of the Notification Management application, choose
 Application Portal 1, and select Confirm.
After assigning the organization structure to the application, the application can display the nodes, layers, and resources of the organization structure. For more information on assigning organization structures to applications, see Assigning Organization Structurt.
Step 3: Assign a Menu Group to a Role
A role is a collection of permissions, including menu access permissions, operation permissions, and organization structure access permissions. Follow the steps below to assign the Reference 1 menu group to a role:
In the left navigation pane of the EnOS Application Portal Admin Console, select Roles.
Select New Role, enter
Normal User 1as the role name, add a description, and select Submit.Select the Manage
of the Normal User 1 role.On the Role Details page, select Assign Menu Group, choose the Notification Management application and the Reference1 menu group, and select Confirm.
After assigning the menu group to the role, users with this role can access the related menu group. For more information on menu group access permissions, see Assigning Menu Groups.
Step 4: Assign Visible Organization Structures to a Role (Optional)
A visible organization structure is an organization structure associated with an application and assigned to a specific role. Users with roles associated with visible organization structures can view the hierarchy and nodes of the organization structure in the application.
In the left navigation pane of the EnOS Application Portal Admin Console, select Roles.
Select the Manage
of the Normal User 1 role.On the Role Details page, select Assign Organization Structure, choose the Notification Management application and the Application Portal 1 organization structure, and select Confirm.
After assigning the organization structure to the role, users with this role can view the corresponding organization structure hierarchy and nodes when accessing the application. For more information on visible organization structures, see Assigning Visible Organization Structures.
Step 5: Assign Operational Permissions to a Role
Operational permissions are units used to allocate certain advanced operation permissions within an application. In the EnOS Application Portal, OU administrators can assign operational permissions to roles, thereby granting users with those roles the necessary application operation permissions.
In the left navigation pane of the EnOS Application Portal Admin Console, select Roles.
Select the Manage
of the Normal User 1 role.On the Role Details page, select Assign Operational Permissions, choose the Notification Management application and the required operation permissions, and select Confirm.
After assigning operational permissions to the role, users with this role can have the corresponding operation permissions when accessing the application. For more information on operational permissions, see Assigning Operational Permissions.
Step 6: Assign Permissions to Users
Follow the steps below to assign menu group access permissions to users, ensuring they can access the menus of EnOS native applications:
In the left navigation pane of the EnOS Application Portal Admin Console, select Users.
Find your username and select Manage
.On the User Details page, select Assign Role, choose Normal User 1, and select Confirm.
After the user gains access to the menu group, they can access the Notification Management application’s menus from the left menu bar in the EnOS Application Portal’s Developer Console. For more information on managing user permissions, see Managing Users.
Step 7: Assign an Organization Structure to a User (Optional)
Follow the steps below to assign an organization structure to a user, ensuring they can own the corresponding assets in the organization structure:
In the left navigation pane of the EnOS Application Portal Admin Console, select Users.
Find your username and select Manage
.On the User Details page, select Assign Organization Structure, choose Application Portal 1, and select Confirm.
After the user gains the organization structure, they can access the corresponding asset permissions in the Notification Management application. For more information on managing organization structures, see Assigning Organization Structures.
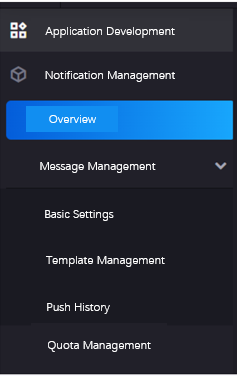
Result: After completing the above steps, you can return to the Developer Console of the EnOS Application Portal, select Application Development > Notification Management. At this point, you can find and access the Landing Page menu from the left menu bar, as shown below.
Authorizing Custom Applications
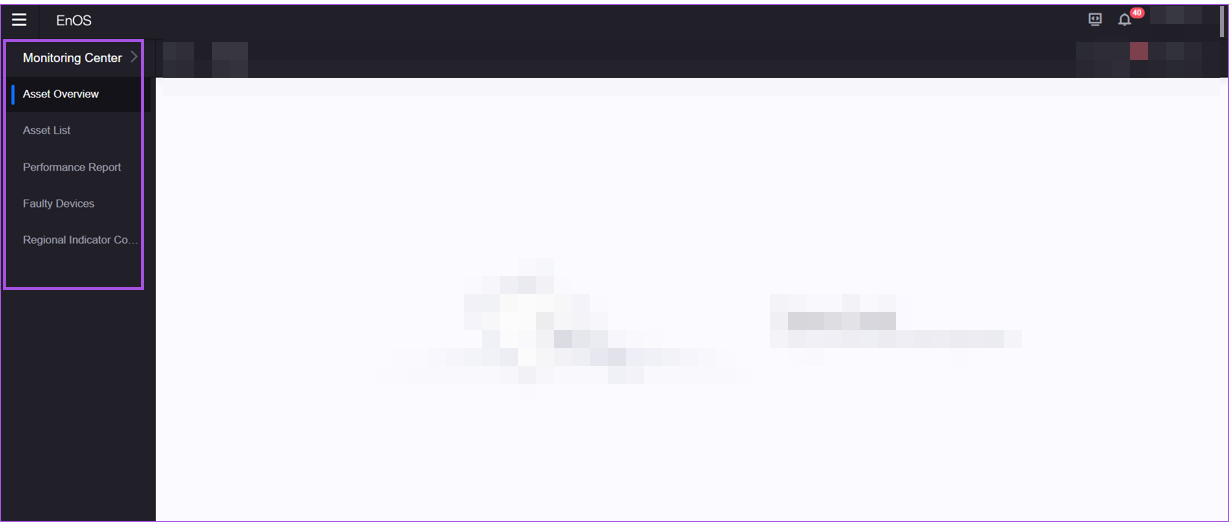
Custom applications are applications that end-users can access in the EnOS Application Portal. This section uses the Monitoring Center as an example.
Prerequisites
Before you start, ensure the following:
The current OU has registered or obtained the application in Developer Console > Application Development > Application Registration.
For more information on application registration or acquisition and menu permissions, contact the tenant administrator.
Step 1: Assign an Organization Structure to the Application
An organization structure, based on nodes, displays the hierarchical relationships within an OU based on factors such as function or region. Follow the steps below to create an organization structure and assign it to the application:
In the left navigation pane of the EnOS Application Portal Admin Console, select Organization Structure.
Select New Organization Structure, enter
Application Portal 2as the name of the organization structure, and select Submit.In the left navigation pane, select Application Management > Application Management.
Select the Assign Organization Structure
of the Smart Control application, choose Application Portal 2, and select Confirm.
After assigning the organization structure to the application, the application can display the nodes, layers, and resources of the organization structure. For more information on assigning organization structures to applications, see Assigning Organization Structures.
Step 2: Configure Menu Groups
A menu group is a collection of application menus that users can use to access various functional pages within an application. Follow the steps below to configure the menu group for the application shortcut:
In the left navigation pane of the EnOS Application Portal Admin Console, select Application Management > Application Management.
Select the Manage Menu Groups
of the application you need to manage.Select the plus sign icon + from the Menu Group list, enter
Reference 2as the name of the new menu group, and select Submit.Select Configuration Menu, check the required menus, and choose Confirm. (In this tutorial, all menus of this application are selected.)
For more information on menu groups, see Managing Menu Groups.
Step 3: Assign a Menu Group to a Role
A role is a collection of permissions, including menu access permissions, operation permissions, and organization structure access permissions. Follow the steps below to assign the Reference 2 menu group to a role:
In the left navigation pane of the EnOS Application Portal Admin Console, select Roles.
Select New Role, enter
Normal User 2as the role name, add a description, and select Submit.Select the Manage
of the Normal User 2 role.On the Role Details page, select Assign Menu Group, choose the Monitoring Center application and the Reference 2 menu group, and select Confirm.
After assigning the menu group to the role, users with this role can access the related menu group. For more information on menu group access permissions, see Assigning Menu Groups.
Step 4: Assign Visible Organization Structures to a Role
A visible organization structure is an organization structure associated with an application and assigned to a specific role. Users with roles associated with visible organization structures can view the hierarchy and nodes of the organization structure in the application.
In the left navigation pane of the EnOS Application Portal Admin Console, select Roles.
Select the Manage
of the Normal User 2 role.On the Role Details page, select Assign Organization Structure, choose the Monitoring Center application and the Application Portal 2 organization structure, and select Confirm.
After assigning the organization structure to the role, users with this role can view the corresponding organization structure hierarchy and nodes when accessing the application. For more information on visible organization structures, see Assigning Visible Organization Structures.
Step 5: Assign Operational Permissions to a Role
Operational permissions are units used to allocate certain advanced operation permissions within an application. In the EnOS Application Portal, OU administrators can assign operational permissions to roles, thereby granting users with those roles the necessary application operation permissions.
In the left navigation pane of the EnOS Application Portal Admin Console, select Roles.
Select the Manage
of the Normal User 2 role.On the Role Details page, select Assign Operational Permissions, choose the Monitoring Center application and the required operation permissions, and select Confirm.
After assigning operational permissions to the role, users with this role can have the corresponding operation permissions when accessing the application. For more information on operational permissions, see Assigning Operational Permissions.
Step 6: Assign Permissions to Users
Follow the steps below to assign menu group access permissions to users, ensuring they can access the Landing Page menu of the Monitoring Center application:
In the left navigation pane of the EnOS Application Portal Admin Console, select Users.
Find your username and select Manage
.On the User Details page, select Assign Role, choose Normal User 2, and select Confirm.
On the User Details page, select Assign Organization Structure, choose Application Portal 2, and select Confirm.
After the user gains access to the menu group, they can access the Monitoring Center application’s menus from the left menu bar in the EnOS Application Portal’s Developer Console. For more information on managing user permissions, see Managing Users.
Step 7: Assign an Organization Structure to a User (Optional)
Follow the steps below to assign an organization structure to a user, ensuring they can own the corresponding assets in the organization structure:
In the left navigation pane of the EnOS Application Portal Admin Console, select Users.
Find your username and select Manage
.On the User Details page, select Assign Organization Structure, choose Application Portal 2, and select Confirm.
After the user gains the organization structure, they can access the corresponding asset permissions in the Monitoring Center application. For more information on managing organization structures, see Assigning Organization Structures.
After completing the above steps, you can return to the Frontend of the EnOS Application Portal, find the Monitoring Center application in the left menu bar, and access the corresponding menus, as shown below: