Unit 2: Connecting PC to EnOS and Ingesting Data
In this unit, you will use the EnOS Java SDK for MQTT to configure the development environment, write code to connect a personal computer (PC) to EnOS Cloud, collect system and hardware data, and upload it to the cloud. This assumes you have completed device modeling and registration on EnOS Application Portal as described in Unit 1.
For detailed information about EnOS Java SDK for MQTT, refer to the Readme file on GitHub.
Step 1: Setting up the Development Environment
Set up the Java development environment and add necessary dependencies Java SE 8 and Maven 3, to support the EnOS Java SDK for MQTT and system information collection.
Install Java SE 8 (JDK 8). Download from: https://www.oracle.com/technetwork/java/javase/downloads/jdk8-downloads-2133151.html.
Install Maven 3. Download from: http://maven.apache.org/download.cgi.
Install a development environment, such as IntelliJ IDEA. Download from: https://www.jetbrains.com/idea/download/.
Add the EnOS Java SDK for MQTT dependency to your project’s
pom.xmlfile:<dependency> <groupId>com.envisioniot</groupId> <artifactId>enos-mqtt</artifactId> <version>2.2.16</version> </dependency>
Add the oshi dependency to your project’s
pom.xmlfile to collect computer operating system and hardware information:<dependency> <groupId>com.github.oshi</groupId> <artifactId>oshi-core</artifactId> <version>3.13.2</version> </dependency>
Step 2. Programming for Device Connection
Write code using the EnOS Java SDK for MQTT to connect the PC to the EnOS Cloud.
Create a new Java class (e.g.,
Sample.java) and add the following necessaryimportstatements:import com.envisioniot.enos.iot_mqtt_sdk.core.ConnCallback; import com.envisioniot.enos.iot_mqtt_sdk.core.MqttClient; import com.envisioniot.enos.iot_mqtt_sdk.message.upstream.tsl.*; import oshi.SystemInfo; import oshi.hardware.HardwareAbstractionLayer; import oshi.software.os.OperatingSystem; import java.util.HashMap; import java.util.Map;
Declare the variables to be used in the program, replacing the placeholders as follows:
private static final String uri = "tcp://{address}:11883"; // Replace {address} with the actual MQTT Broker address
private static final String productKey = "your_product_key";
private static final String deviceKey = "your_device_key";
private static final String deviceSecret = "your_device_secret";
private static MqttClient client;
Replacement Instructions:
Replace
{address}and{port}with the MQTT Broker address and port of your EnOS. Log in to EnOS Application Portal’s Developer Console, click Help > Environment Information in the top-right corner to obtain the MQTT Broker address and port.For testing or learning scenarios, use the TCP port 11883, which requires no additional configuration but offers lower security. If higher security is needed, use the SSL TCP port 18883, ensuring your EnOS environment has SSL enabled and the client is configured with SSL certificates. Contact your system administrator if needed.
productKey,deviceKey, anddeviceSecretare the device triple information generated in Unit 1.
Write the
connect()function to initialize the device connection and ensure the connection is established before proceeding:public static void connect() throws Exception { System.out.println("Starting connection to EnOS Cloud..."); try { client = new MqttClient(uri, productKey, deviceKey, deviceSecret); client.getProfile().setConnectionTimeout(60).setAutoReconnect(true); client.connect(new ConnCallback() { @Override public void connectComplete(boolean reconnect) { System.out.println("Connection successful" + (reconnect ? " (reconnected)" : "")); } @Override public void connectLost(Throwable cause) { System.out.println("Connection lost: " + cause.getMessage()); } @Override public void connectFailed(Throwable cause) { System.out.println("Connection failed: " + cause.getMessage()); } }); // Wait for connection to complete, up to 5 seconds int maxWaitTime = 5000; // milliseconds long startTime = System.currentTimeMillis(); while (!client.isConnected() && (System.currentTimeMillis() - startTime) < maxWaitTime) { Thread.sleep(100); } if (!client.isConnected()) { throw new Exception("Failed to connect to EnOS Cloud within timeout period."); } System.out.println("Connection status: " + client.isConnected()); } catch (Throwable e) { System.err.println("Connection error: " + e.getMessage()); throw e; } }
Step 3. Collecting Data and Uploading to EnOS Cloud
Collect system and hardware data from the PC and upload it to the EnOS Cloud as attributes and measurement points:
Write the
collectDeviceInfo()function to collect system and hardware data from the PC. Refer to the following code example:public static Map<String, Object> collectDeviceInfo() { SystemInfo si = new SystemInfo(); HardwareAbstractionLayer hal = si.getHardware(); OperatingSystem os = si.getOperatingSystem(); Map<String, Object> data = new HashMap<>(); data.put("system", os.toString()); data.put("model", hal.getComputerSystem().getManufacturer() + " " + hal.getComputerSystem().getModel()); data.put("cpu_core", hal.getProcessor().getLogicalProcessorCount()); data.put("cpu_used", hal.getProcessor().getSystemCpuLoad()); data.put("mem_total", hal.getMemory().getTotal()); data.put("mem_used", hal.getMemory().getAvailable()); // Note: mem_used represents available memory data.put("cpu_used_average", hal.getProcessor().getSystemLoadAverage()); data.put("cpu_temperature", hal.getSensors().getCpuTemperature()); return data; }
Write the
updateAttribute()function to update the PC device’s attributes on EnOS Application Portal using the collected system and hardware data. Refer to the following code example:public static void updateAttribute() { Map<String, Object> deviceInfo = collectDeviceInfo(); System.out.println("Computer info: " + deviceInfo); AttributeUpdateRequest request = AttributeUpdateRequest.builder() .setQos(1) .addAttribute("system", deviceInfo.get("system")) .addAttribute("model", deviceInfo.get("model")) .addAttribute("cpu_core", deviceInfo.get("cpu_core")) .addAttribute("mem_total", deviceInfo.get("mem_total")) .build(); System.out.println(">>> Update Attribute: " + request); try { AttributeUpdateResponse resp = client.publish(request); System.out.println("<-- Response: " + resp); } catch (Exception e) { System.err.println("Failed to update attributes: " + e.getMessage()); e.printStackTrace(); } }
Write the
postMeasurepointfunction to upload the collected CPU load and memory usage data as measurement points to the EnOS Cloud. Refer to the following code example:public static void postMeasurepoint(Map<String, Object> systemInfo) { MeasurepointPostRequest request = MeasurepointPostRequest.builder() .setQos(0) .addMeasurePoint("cpu_used", (Double) systemInfo.get("cpu_used")) .addMeasurePoint("mem_used", ((Long) systemInfo.get("mem_used")).doubleValue()) // Convert to double type .build(); System.out.println(">>> Post Measurepoint: " + request); try { MeasurepointPostResponse resp = client.publish(request); System.out.println("<-- Response: " + resp); } catch (Exception e) { System.err.println("Failed to post measurepoint: " + e.getMessage()); e.printStackTrace(); } }
Step 4. Running the Program and Checking the Results
Compile and run the program to verify the device connection and data upload, and check the results on EnOS Application Portal:
Combine all code into a complete
Sample.javafile:import com.envisioniot.enos.iot_mqtt_sdk.core.ConnCallback; import com.envisioniot.enos.iot_mqtt_sdk.core.MqttClient; import com.envisioniot.enos.iot_mqtt_sdk.message.upstream.tsl.*; import oshi.SystemInfo; import oshi.hardware.HardwareAbstractionLayer; import oshi.software.os.OperatingSystem; import java.util.HashMap; import java.util.Map; public class Sample { private static final String uri = "tcp://{address}:11883"; // Replace with actual MQTT Broker address private static final String productKey = "your_product_key"; private static final String deviceKey = "your_device_key"; private static final String deviceSecret = "your_device_secret"; private static MqttClient client; public static void main(String[] args) throws Exception { connect(); updateAttribute(); postMeasurepoint(collectDeviceInfo()); } public static void connect() throws Exception { System.out.println("Starting connection to EnOS Cloud..."); try { client = new MqttClient(uri, productKey, deviceKey, deviceSecret); client.getProfile().setConnectionTimeout(60).setAutoReconnect(true); client.connect(new ConnCallback() { @Override public void connectComplete(boolean reconnect) { System.out.println("Connection successful" + (reconnect ? " (reconnected)" : "")); } @Override public void connectLost(Throwable cause) { System.out.println("Connection lost: " + cause.getMessage()); } @Override public void connectFailed(Throwable cause) { System.out.println("Connection failed: " + cause.getMessage()); } }); // Wait for connection to complete, up to 5 seconds int maxWaitTime = 5000; // milliseconds long startTime = System.currentTimeMillis(); while (!client.isConnected() && (System.currentTimeMillis() - startTime) < maxWaitTime) { Thread.sleep(100); } if (!client.isConnected()) { throw new Exception("Failed to connect to EnOS Cloud within timeout period."); } System.out.println("Connection status: " + client.isConnected()); } catch (Throwable e) { System.err.println("Connection error: " + e.getMessage()); throw e; } } public static Map<String, Object> collectDeviceInfo() { SystemInfo si = new SystemInfo(); HardwareAbstractionLayer hal = si.getHardware(); OperatingSystem os = si.getOperatingSystem(); Map<String, Object> data = new HashMap<>(); data.put("system", os.toString()); data.put("model", hal.getComputerSystem().getManufacturer() + " " + hal.getComputerSystem().getModel()); data.put("cpu_core", hal.getProcessor().getLogicalProcessorCount()); data.put("cpu_used", hal.getProcessor().getSystemCpuLoad()); data.put("mem_total", hal.getMemory().getTotal()); data.put("mem_used", hal.getMemory().getAvailable()); // Represents available memory data.put("cpu_used_average", hal.getProcessor().getSystemLoadAverage()); data.put("cpu_temperature", hal.getSensors().s.getCpuTemperature()); return data; } public static void updateAttribute() { Map<String, Object> deviceInfo = collectDeviceInfo(); System.out.println("Computer info: " + deviceInfo); AttributeUpdateRequest request = AttributeUpdateRequest.builder() .setQos(1) .addAttribute("system", deviceInfo.get("system")) .addAttribute("model", deviceInfo.get("model")) .addAttribute("cpu_core", deviceInfo.get("cpu_core")) .addAttribute("mem_total", deviceInfo.get("mem_total")) .build(); System.out.println(">>> Update Attribute: " + request); try { AttributeUpdateResponse resp = client.publish(request); System.out.println("<-- Response: " + resp); } catch (Exception e) { System.err.println("Failed to update attributes: " + e.getMessage()); e.printStackTrace(); } } public static void postMeasurepoint(Map<String, Object> systemInfo) { MeasurepointPostRequest request = MeasurepointPostRequest.builder() .setQos(0) .addMeasurePoint("cpu_used", (Double) systemInfo.get("cpu_used")) .addMeasurePoint("mem_used", ((Long) systemInfo.get("mem_used")).doubleValue()) .build(); System.out.println(">>> Post Measurepoint: " + request); try { MeasurepointPostResponse resp = client.publish(request); System.out.println("<-- Response: " + resp); } catch (Exception e) { System.err.println("Failed to post measurepoint: " + e.getMessage()); e.printStackTrace(); } } }
Compile and run the program. If the connection and data upload are successful, the program will output results similar to the following:
Starting connection to EnOS Cloud...
Connection successful
Connection status: true
Computer info: {mem_used=1401421824, cpu_used_average=-1.0, cpu_temperature=0.0, cpu_used=1.0, system=Microsoft Windows 10 build 17134, cpu_core=4, model=LENOVO 80T9, mem_total=8135401472}
>>> Update Attribute: AnswerableMessageBody{id='null', method='thing.attribute.update', version='null', params={attributes={system=Microsoft Windows 10 build 17134, cpu_core=4, model=LENOVO 80T9, mem_total=8135401472}}}
>>> Post Measurepoint: AnswerableMessageBody{id='null', method='thing.measurepoint.post', version='null', params={measurepoints={mem_used=1314672640, cpu_used=0.4697233989534014}, time=1565841030584}}
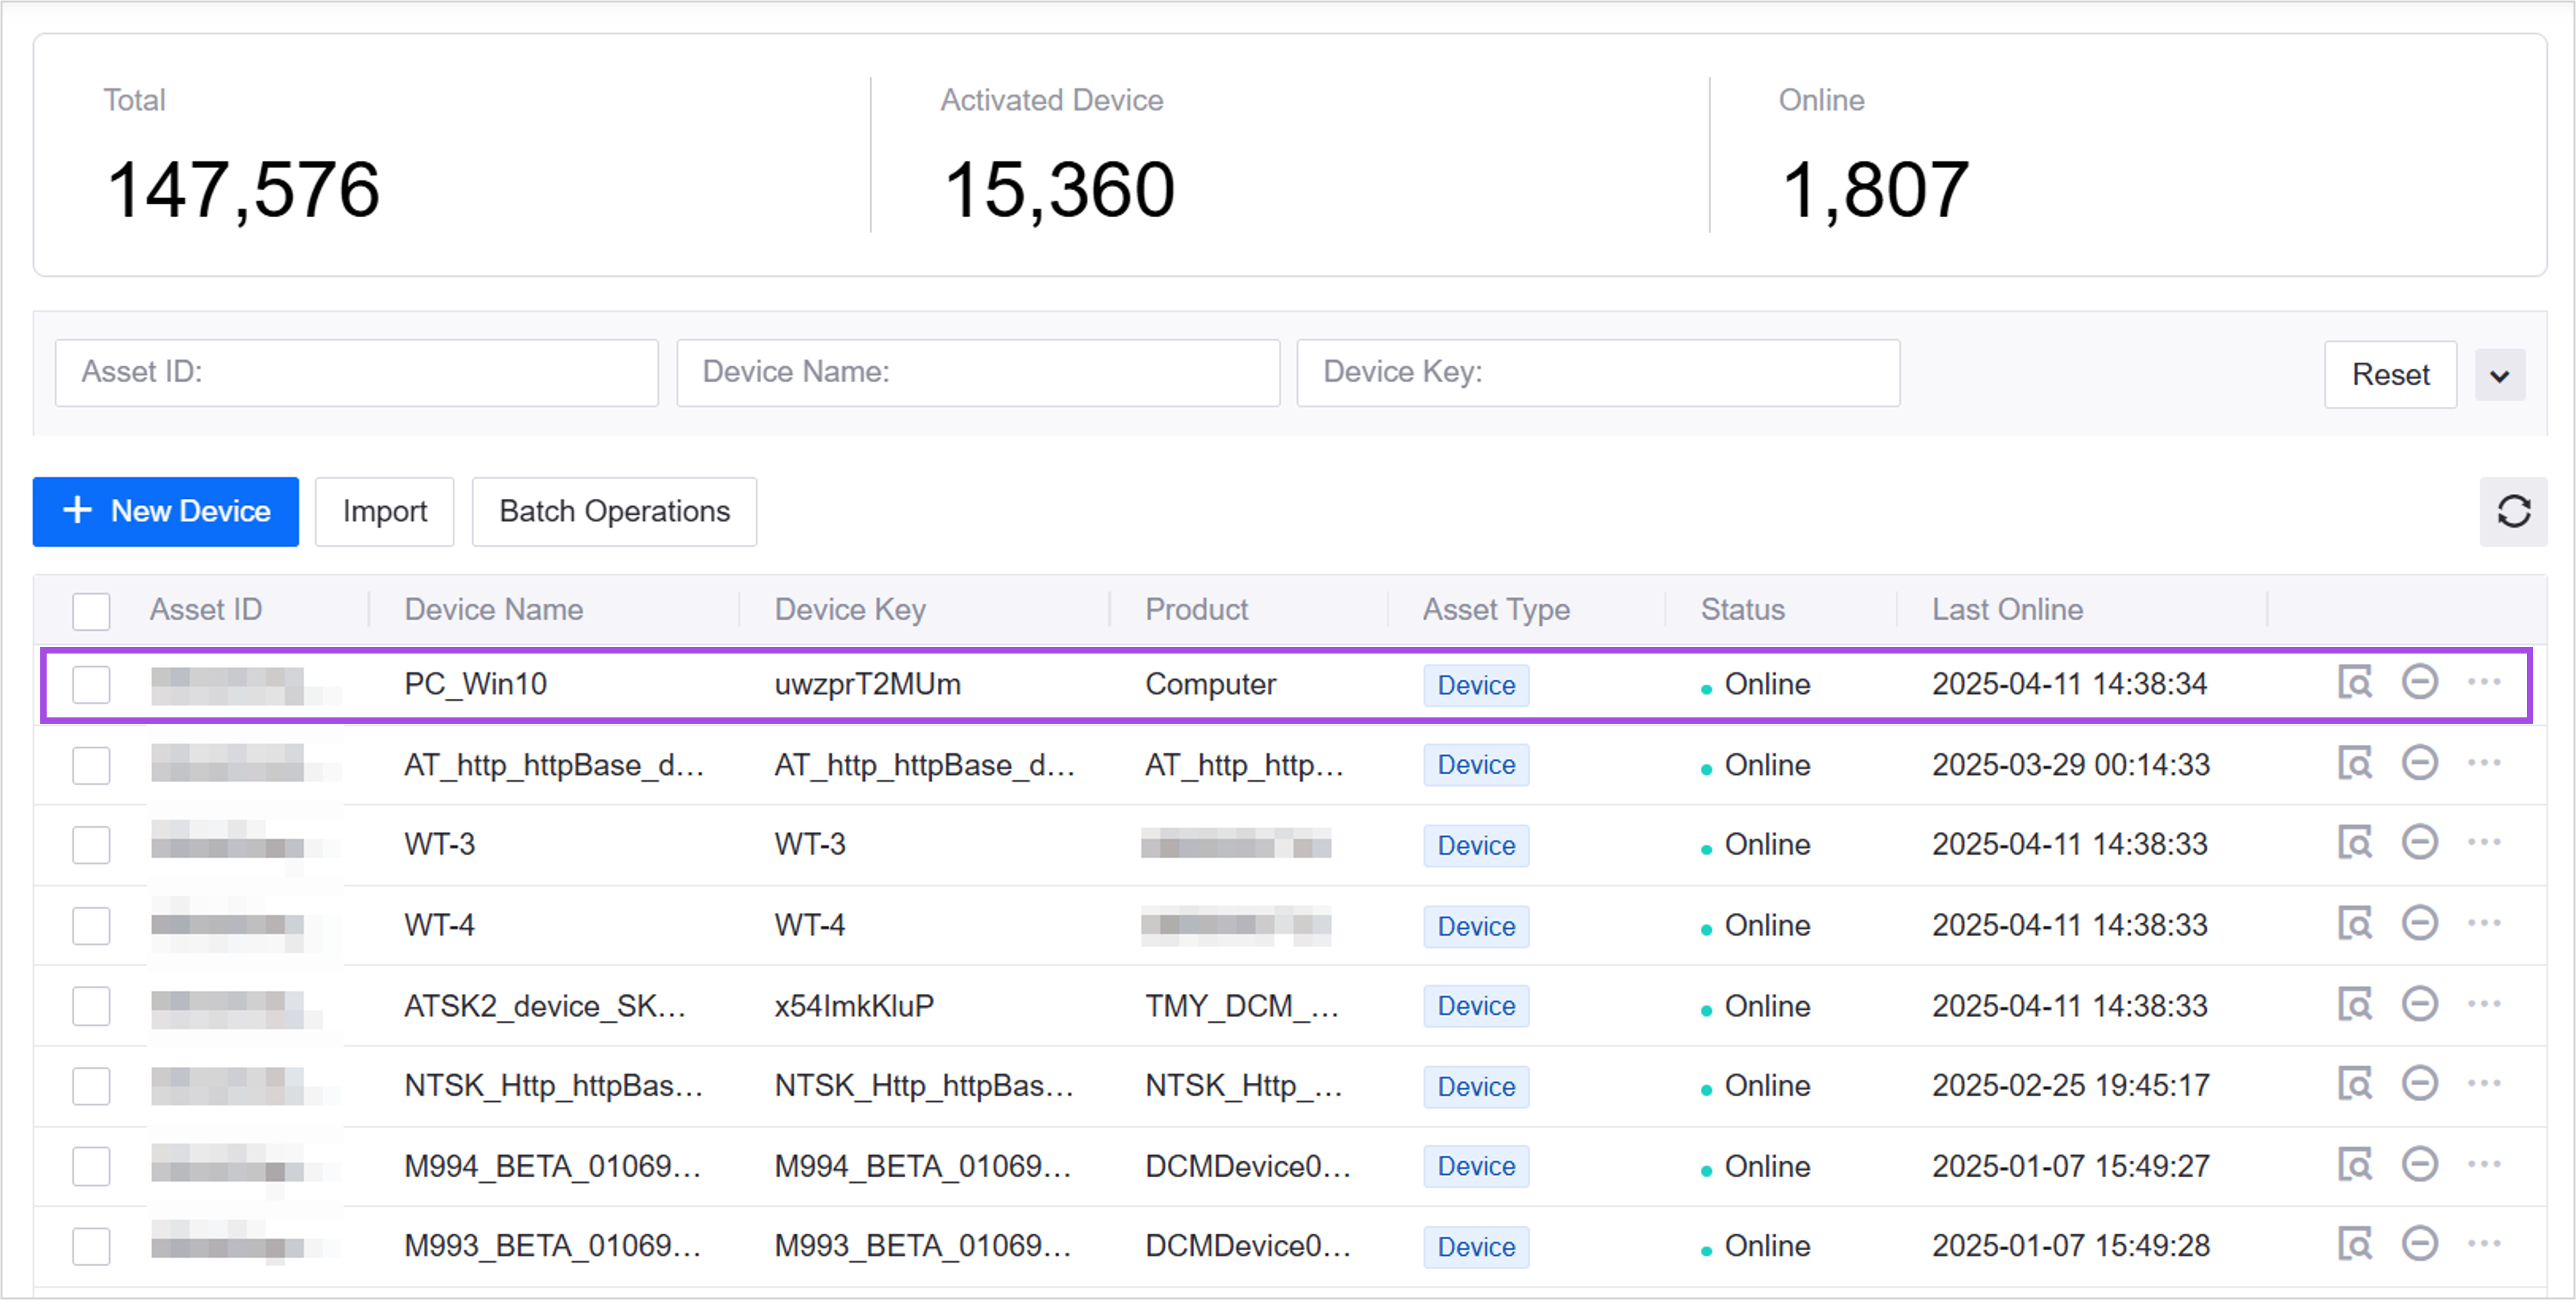
Log in to Developer Console of EnOS Application Portal and check the PC device’s status in Device Management > Device Assets. The status of the device should be Online.
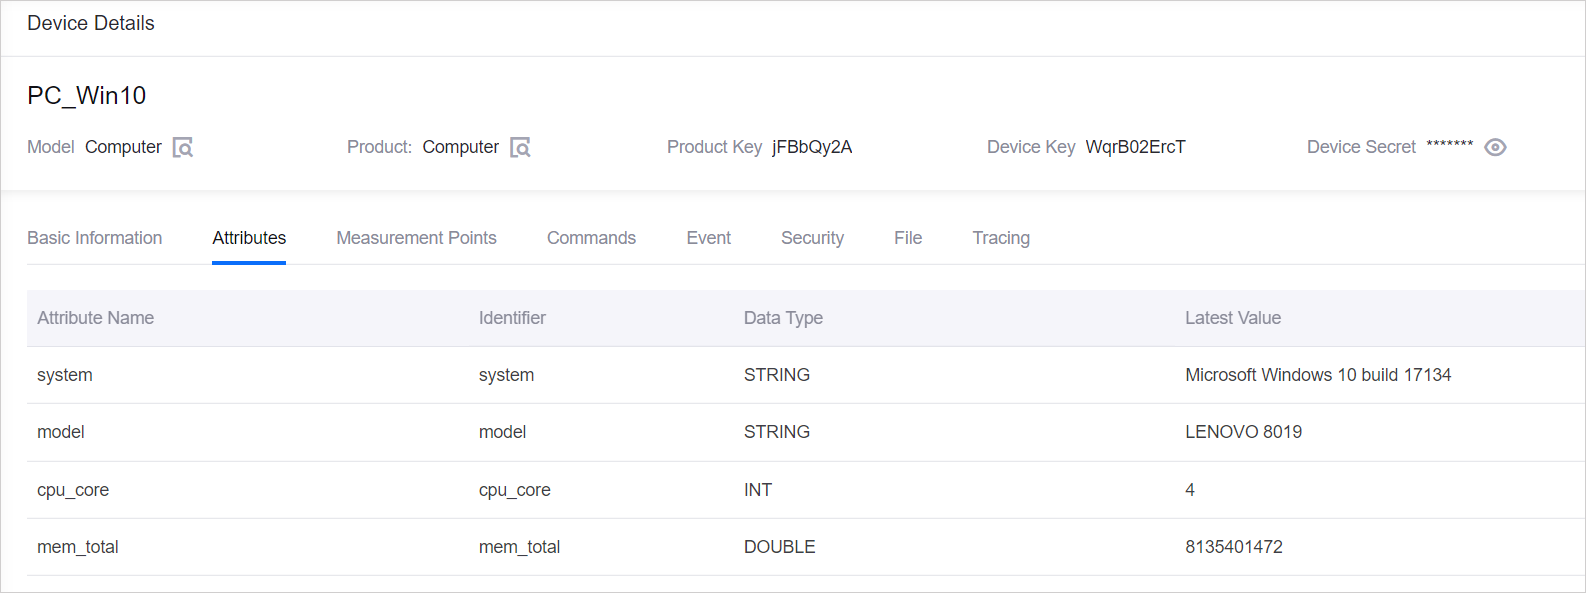
On the Device Details page, under the Attributes tab, verify that the PC device’s attributes have been updated successfully.
On the Device Details page, under the Measurement Points tab, check that the uploaded
cpu_usedandmem_usedmeasurement point data are displayed correctly.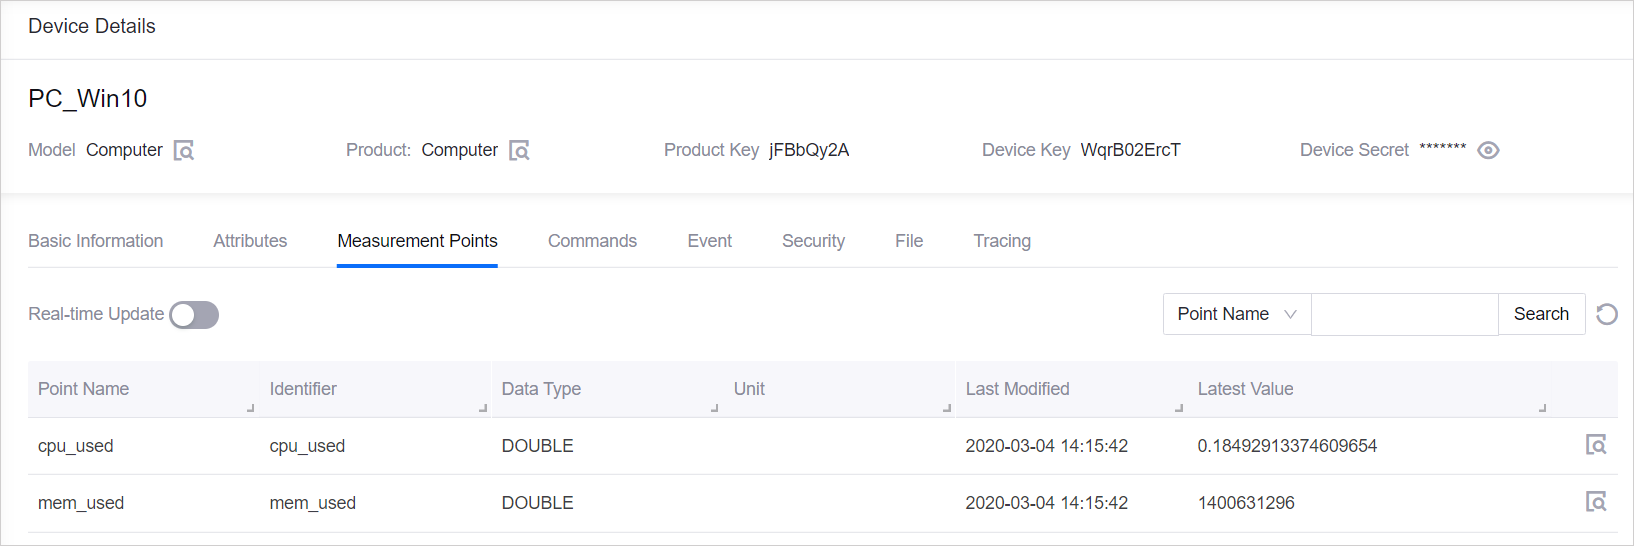
Note: If the
mem_useddata does not display, ensure that themem_usedpoint in the EnOS device model is defined as adoubletype. If issues persist, verify the data type conversion in thepostMeasurepointfunction.